Plan, size, place and manage trades — risk-based sizing, attached brackets, and a discipline layer that holds you to the plan you committed at entry.
/trade is where you place and manage trades: a chart, an order ticket, and your positions, orders and history in one workspace whose panels you can drag, resize and collapse. Every order is signed by your own wallet and executed on Hyperliquid — Pantheon never holds your keys — so the ticket needs a connected wallet with USDC deposited before it will submit anything — whichever balance your account holds it in (see Setup, funds and privacy). Without a wallet, the chart, order book and market data all work; positions, history and the risk math do not.
Risk-based sizing (Smart Order)
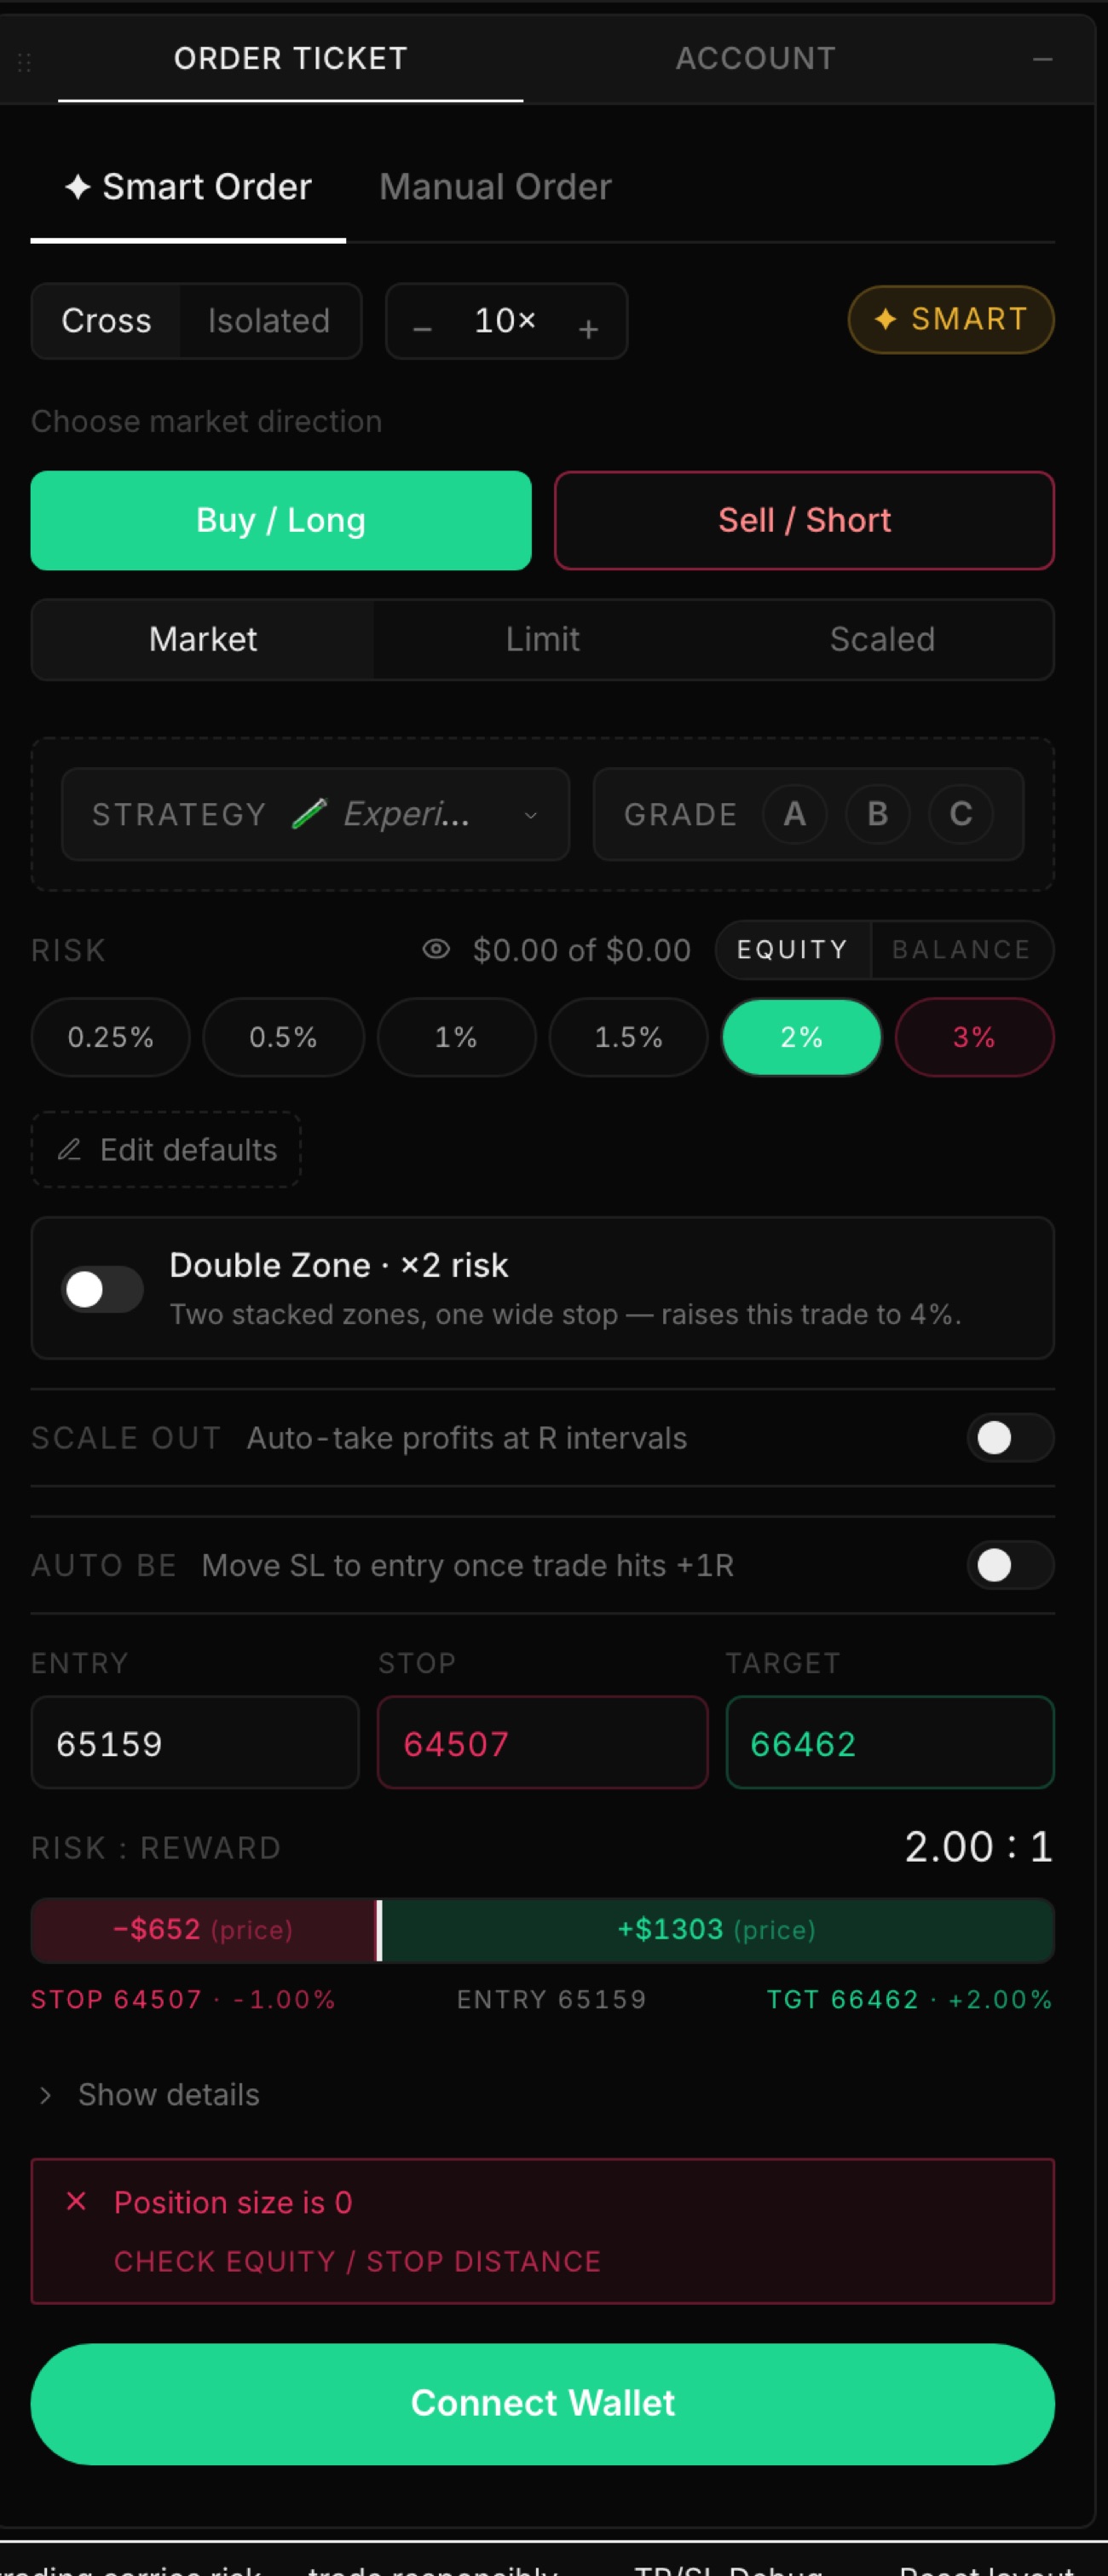
Smart Order sizes every trade from a risk budget instead of a size field. You commit to a stop, pick the percentage of your account the trade may lose, and the ticket computes the position size: the dollar risk divided by the distance from entry to stop. On a $10,000 account, a 1% chip risks $100; with a stop $2 below entry, that is a 50-unit position. You never type a size — and without a stop there is no size, so the ticket blocks until you set one.
The percentage is measured against Equity (includes open P&L) or Balance (realised cash only), your choice; either way the basis is your whole account. The ticket starts with no chip picked: grading the setup A, B or C fills one in as a nudge — 2%, 1% or 0.5% — and you can override it, but one way or another a chip must be picked before the ticket will submit. In Locked In and Zen — two of the three trading modes, covered below — the chips run 0.25% to 3%, with anything above 2% marked as over the guideline; Degen swaps in a 1% to 10% row with that colouring off.
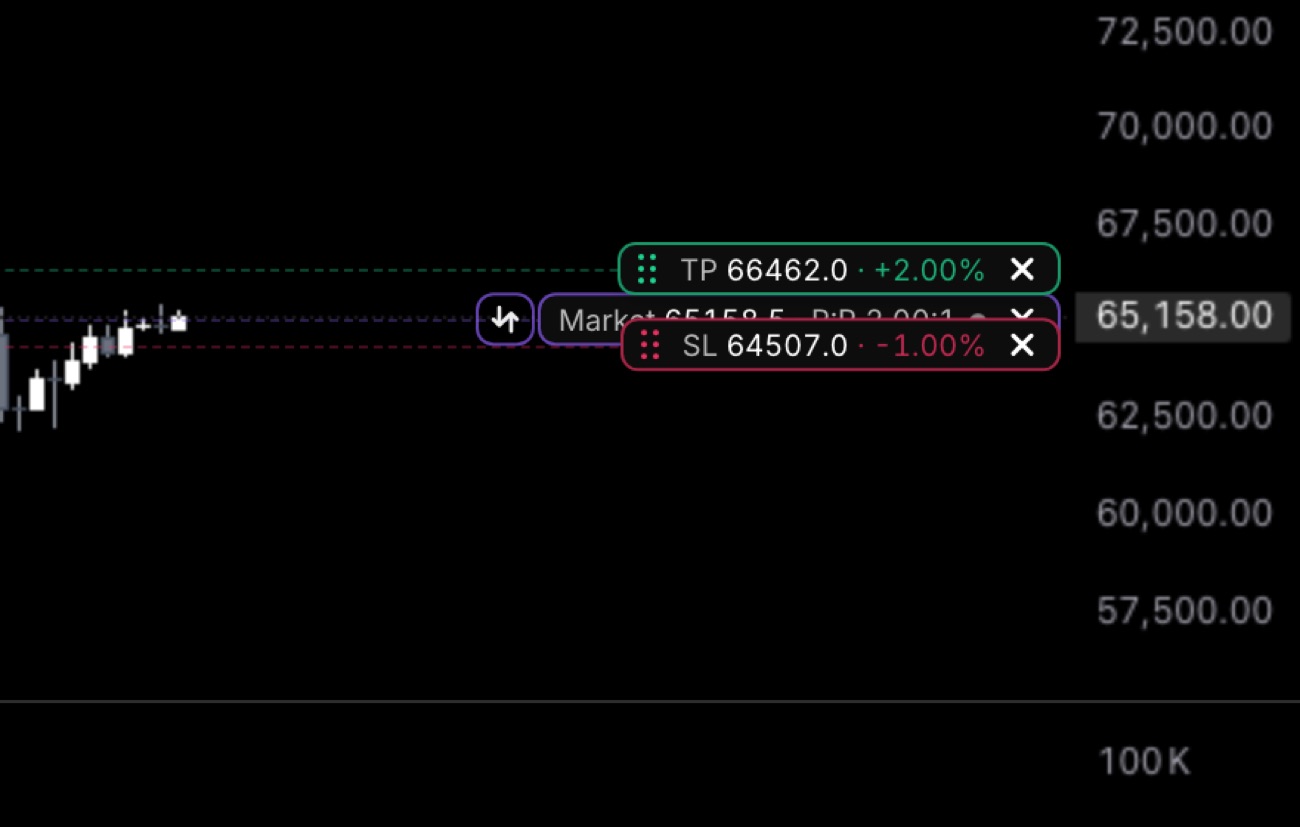
Clicking Buy or Sell opens the chart planner, seeded with an entry at the live mid, a stop 1% away and a target 2% away — a starting 2:1 you drag or type into shape. The chart pills and the ticket's Entry / Stop / Target fields are the same values: move one and the other follows. Clicking the same side again tears the plan down.
Double Zone is the one sanctioned way past the per-trade cap: a per-trade declaration that the entry is two stacked zones under one wide stop, which doubles this trade's cap (4% — double the 2% guideline). It opens a warning screen before arming and resets after every placement, so it can never become a standing limit. Smart Order is unavailable while you already hold a position in that market — Manual Order is the path for adding to or closing one.
The ticket after clicking Buy: stop and target seeded 1% and 2% from entry, the 2% risk chip selected, R:R locked at 2.00:1. Size reads 0 because no wallet is connected — no stop or no equity means no size.
Order types
Market orders fill immediately against the book, priced under a slippage cap — 0.5% by default — never "at any price". Limit orders rest at your price. A Scaled entry splits one order into equal-sized limit rungs spread evenly between a start and an end price; all risk and R:R math for a scaled entry uses the blended average fill across the rungs, not the current mark.
Stop and take orders fire when the mark reaches your trigger: the Market variants send a market order, the Limit variants place a resting order at your limit price. These conditional entry types are Manual-only; Smart Order offers exactly Market, Limit and Scaled.
Manual Order is the traditional form: pick a type, type a size (in the asset or in USDC, converted at the mid), submit. Its size slider is a percentage of your buying power (free margin × leverage); with Reduce only ticked and a position open, it becomes a percentage of that position, so 100% is a full close. Reduce-only orders can only shrink a position, never open or grow one. TWAP orders are not offered on the ticket, though one already running on your account still appears in your orders.
Control
What it does
Values
Market
Fills immediately against the book, under the slippage cap.
Smart and Manual
Limit
Rests on the book at your price until filled or cancelled.
Smart and Manual
Scaled
One entry split into equal-sized limit rungs between a start and an end price; risk math uses the blended average fill.
Smart, and Manual via the Pro menu
Stop Market
Sends a market order when the mark reaches your trigger.
Manual (Pro)
Stop Limit
Places a limit order at your limit price when the trigger is reached.
Manual (Pro)
Take Market
As Stop Market, on the profit side of the trigger.
Manual (Pro)
Take Limit
As Stop Limit, on the profit side of the trigger.
Manual (Pro)
Brackets: how TP/SL attach
A bracket is a reduce-only stop-loss and take-profit attached to your entry, and how it attaches depends on the shape of the order. A single market or limit entry with a stop and target is sent as one atomic batch — entry and both legs settle together, so you are never briefly in a position with no protection.
A scaled entry cannot batch that way: the entry ladder goes to the exchange first, and the protective legs attach to whatever position results. A scale-out ladder — taking profit in equal legs across a price range instead of at one target — is always placed as independent reduce-only orders, whatever the leg count. Enable scale-out before the entry has filled and the ladder is armed rather than placed: it shows as ghost "on fill" pills and goes live when the entry fills.
Because scale-out legs are independent orders, closing the position from another application can leave residual legs on the book. Pantheon sweeps them on your next session, and you can clear them yourself from Open Orders; closing from Pantheon sweeps them immediately.
Brackets track position size: when you scale in or partially close, the stop and take-profit are re-placed at the new size automatically. Cancelling an entry also cancels its attached legs. Every placed leg is a real order resting on the exchange, so a live bracket keeps protecting you with the browser closed; the two things that still fire from the app — an armed "on fill" scale-out ladder and Auto BE — run in your browser session and need the tab open.
The planned entry, stop and target ride the chart as pills. Drag one and the ticket's fields follow; ✕ removes a leg.
Managing a live position
An open position renders on the chart as pills: the position itself, its stop and take-profit legs at their trigger prices, and the liquidation price. Drag a leg's pill to move it — the price you drop it at is where it goes. The liquidation pill is read-only: the exchange computes it from margin, leverage and open P&L, so you move it only by adding margin (isolated positions, whole dollars, with an estimated new liquidation price shown as you type) or by closing size.
Moving a leg is a cancel-and-replace on the exchange, and the pill holds in place through the round-trip. If the replacement fails, a red banner pins to the top of the chart with two one-click recoveries — re-place at your intended price, or revert to the price that was working — plus a sticky toast so you see it even away from the chart.
Once the trade is in profit you can move the stop to entry with the BE chip, or automate it: Auto BE, armed before entry, moves the stop to your entry price the moment unrealised profit reaches the multiple of initial risk you chose (0.5R to 2R). It fires once per trade, and moving the stop yourself disarms it.
There is no reversal control — to flip direction, close the position and open the opposite side as a new trade. A position worth less than the $10 minimum order value shows a DUST badge: the exchange refuses reduce-only orders against it, so it cannot be closed until price moves or you merge it into a fresh trade.
Trading modes
The trading mode sets how hard the platform pushes back when an order breaks your rules. Locked In, the default, warns and never blocks: a breach turns the submit button into an amber confirm you can still click through. Degen removes the guardrails. Zen Mode hard-blocks — a breaching order is never sent.
Zen is deliberately hard to leave. It requires at least one playbook with a rule before it can be selected, lists its rules on a confirm screen, and does not switch off on a tap: leaving schedules a 6-hour rollover with a live countdown, which you can cancel to stay locked. Switching between Degen and Locked In is instant.
The mode also sets defaults. Markets you have never customised take 10x leverage in Locked In and Zen, 20x in Degen, always clamped to the market's maximum. You set leverage and margin per market from the ticket's header: Cross / Isolated tabs and a leverage stepper, with the value itself opening a slider. The change is signed to the exchange before the UI reflects it, and your per-market choice sticks — mode defaults apply only to markets you have never touched. Switching modes swaps the risk-chip row to the arriving mode's defaults — unless you have edited the chips yourself, in which case your row stays. A picked chip that is not on the arriving row is cleared, and the ticket blocks until you pick again.
Control
What it does
Values
Degen
Full send: no guardrails, no over-guideline colouring.
Risk chips 1–10% · default leverage 20x
Locked In
The default. Warns on every breach, never blocks — the receipt shows the evidence and you decide.
Hard blocks. Rules: max 2% risk per trade (4% only on a declared Double Zone entry) · every entry carries a stop set at open · hitting the 6% daily loss limit locks you out for 6 hours · max 12% open risk at once · every entry tagged to a real strategy.
Needs a playbook with a rule to enter · leaving takes a 6-hour rollover, not a tap
Tilt and the daily loss budget
Your daily loss budget defaults to 6% of your equity at the start of the day. It is measured on the day's net realised P&L from session trades — trades opened and closed within one sitting, held 16 hours or less — so wins buy back room: a $300 session loss followed by a $200 session win leaves $100 of budget spent, not $300. A multi-day swing whose stop fills today shows in the P&L readout but touches neither the budget nor the streak, in either direction: a planned exit landing is not an intraday spiral. The budget resets at 00:00 UTC. The discipline rail — the strip of pills pinned across the top of the page: tilt state, today's P&L, loss budget, average risk, news — shows the share spent as a bar, amber past 50%, red past 75%, and tilt gives you a heads-up at 80%.
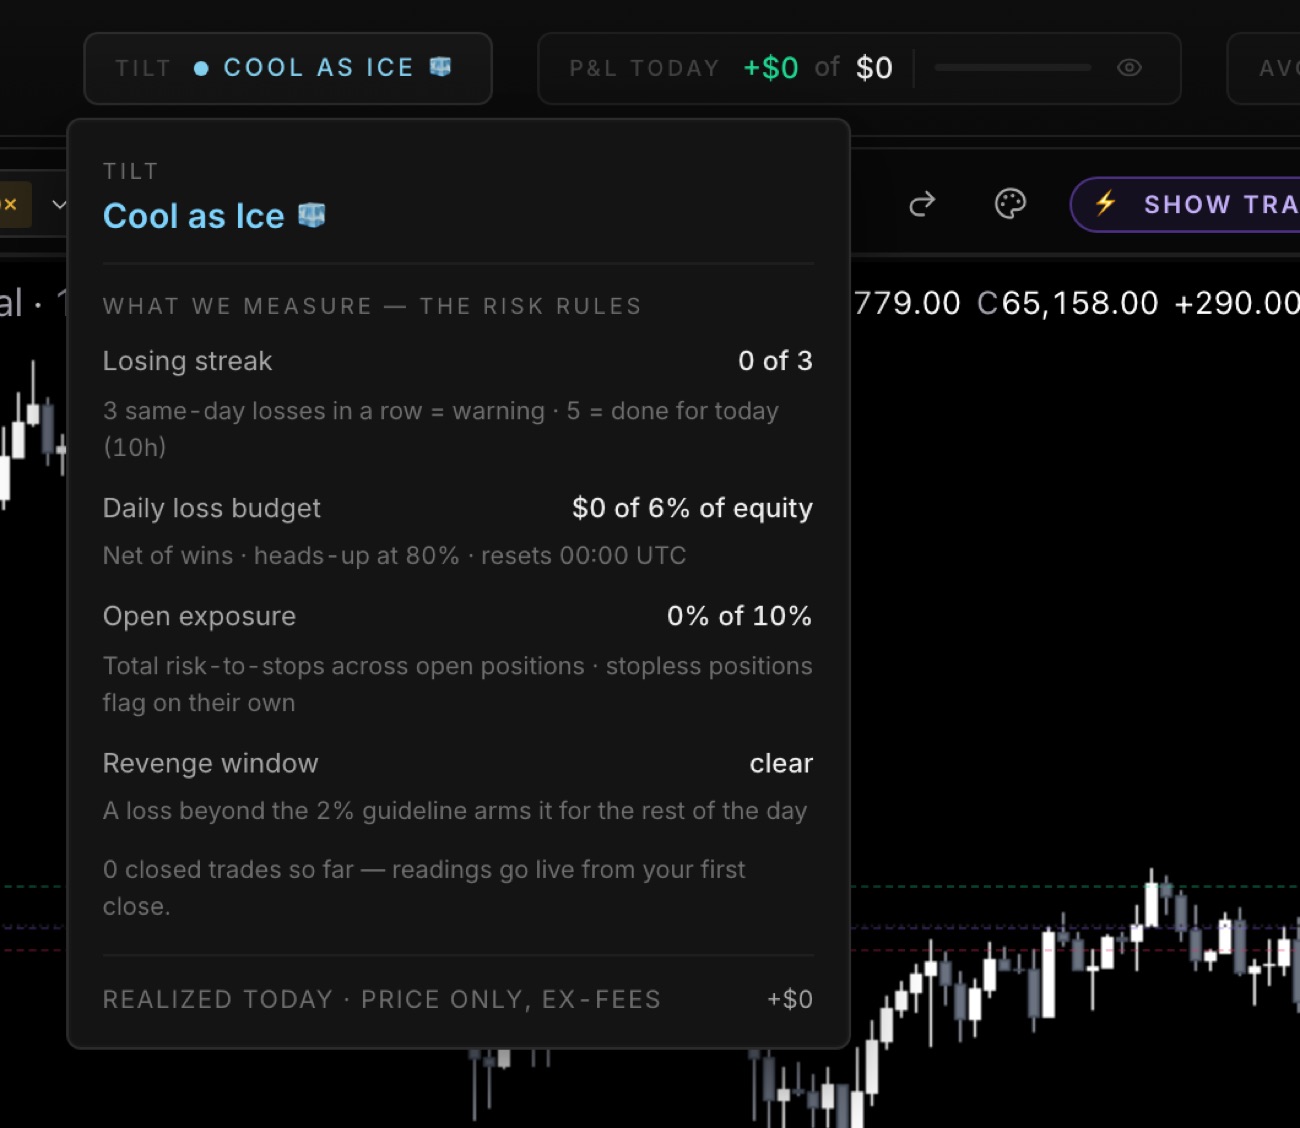
Tilt watches a set of rules and names its state on the rail. Losing streaks count consecutive session losses: three is a warning, five ends your day with a 6-hour cool-off from the fifth losing exit. Breaching the daily loss budget also ends the day. Open exposure has two lines: a 10%-of-equity warning guideline, and a hard 12% ceiling — double the daily budget — that Zen enforces as a block and Locked In surfaces as a receipt, so the warning fires before the wall; a position without a stop trips the exposure rule by itself, whatever its size. And widening an open position's stop past the one you committed at entry, to where the trade risks more than the cap, raises "Stop past plan" — the one state that speaks of your plan, because a widened stop is the only thing that can actually be broken.
The 2% per-trade guideline itself is fixed, not a setting: you can take a bigger trade, but nothing moves the line you are measured against. A single loss beyond 1.25× that guideline arms a revenge window for the rest of the UTC day — the margin is deliberate, so an honest 2% stop-out that slips to 2.1–2.3% counts as a clean exit, not tilt fuel, and a declared Double Zone trade is judged against its doubled allowance. Inside the window the rail reads "Over-plan loss" and every new entry carries the receipt; an entry sized to win back the day's loss is additionally flagged. The window watches — it never blocks an order. The clean-trade streak on /profile runs its own, separate revenge test — re-entering within 15 minutes of a closing loss — so a trade can break that streak without this window ever arming.
When an order would breach a rule, the ticket shows a receipt quoting the evidence — the exact trades and the number breached — before anything is placed. What happens next depends on the mode. In Locked In every receipt, a tripped cool-off included, is an acknowledgeable interrupt: the submit button becomes an amber "Trade anyway" confirm, briefly inert so a double-click cannot blow through it. In Zen Mode the receipt is a hard block: nothing was sent. In Degen no platform receipt fires at all. The one rule that outranks every mode is a lockout you declared yourself — it hard-blocks everywhere, Degen included, because it is your rule, not Pantheon's.
The Tilt popover on a clean day: all four rules with your live reading against each — losing streak, daily loss budget, open exposure, revenge window.
Control
What it does
Cool as Ice
Nothing tripped.
Steady Hands
Two session losses in a row, or half your daily loss budget spent.
On Thin Ice
A rule is active — the pill's detail names which one and shows the reading.
You're Cooked
A five-loss streak or the daily loss budget breached. Done for today, with a 6-hour cool-off counting down on the pill.
NUCLEAR
A liquidation today, or twice the daily budget lost.
R and the plan record
R is the unit the page measures outcomes in: multiples of the risk you committed at entry — the dollar distance from entry to your stop, times your size. A trade that risked $100 and made $250 is +2.5R; one that risked $100 and lost $150 is −1.5R. Because R is anchored to the stop committed at entry, results are comparable across position sizes — and a trade submitted without a stop has no R at all.
Every fresh entry is logged to your journal automatically at submit, carrying the strategy and grade from the ticket. Untagged trades log as Experimental — the off-framework bucket, kept visible so the journal shows what winging it costs. Adding to an existing position does not re-log; the original trade owns the tag. The grade stays editable for 60 seconds after it is set, then locks. In Zen Mode an untagged entry will not submit.
Closed Today grades each round trip against the plan you actually committed, and the rail's "Plan kept" pill is the running count — honored out of planned, with no-stop trades surfaced separately as "+N no plan" rather than silently passing. While a position is open, its Risk column compares live risk-to-stop against what you planned: within a quarter of a percentage point passes, beyond that it is tagged HOT, and beyond half a point OVER PLAN.
Control
What it does
Honored
Stayed inside both the planned stop and the planned size.
Violated
Lost past the planned stop, or entered bigger than planned — a winner still fails when oversized.
No plan
Submitted without a measurable stop. Nothing to grade.
News guard
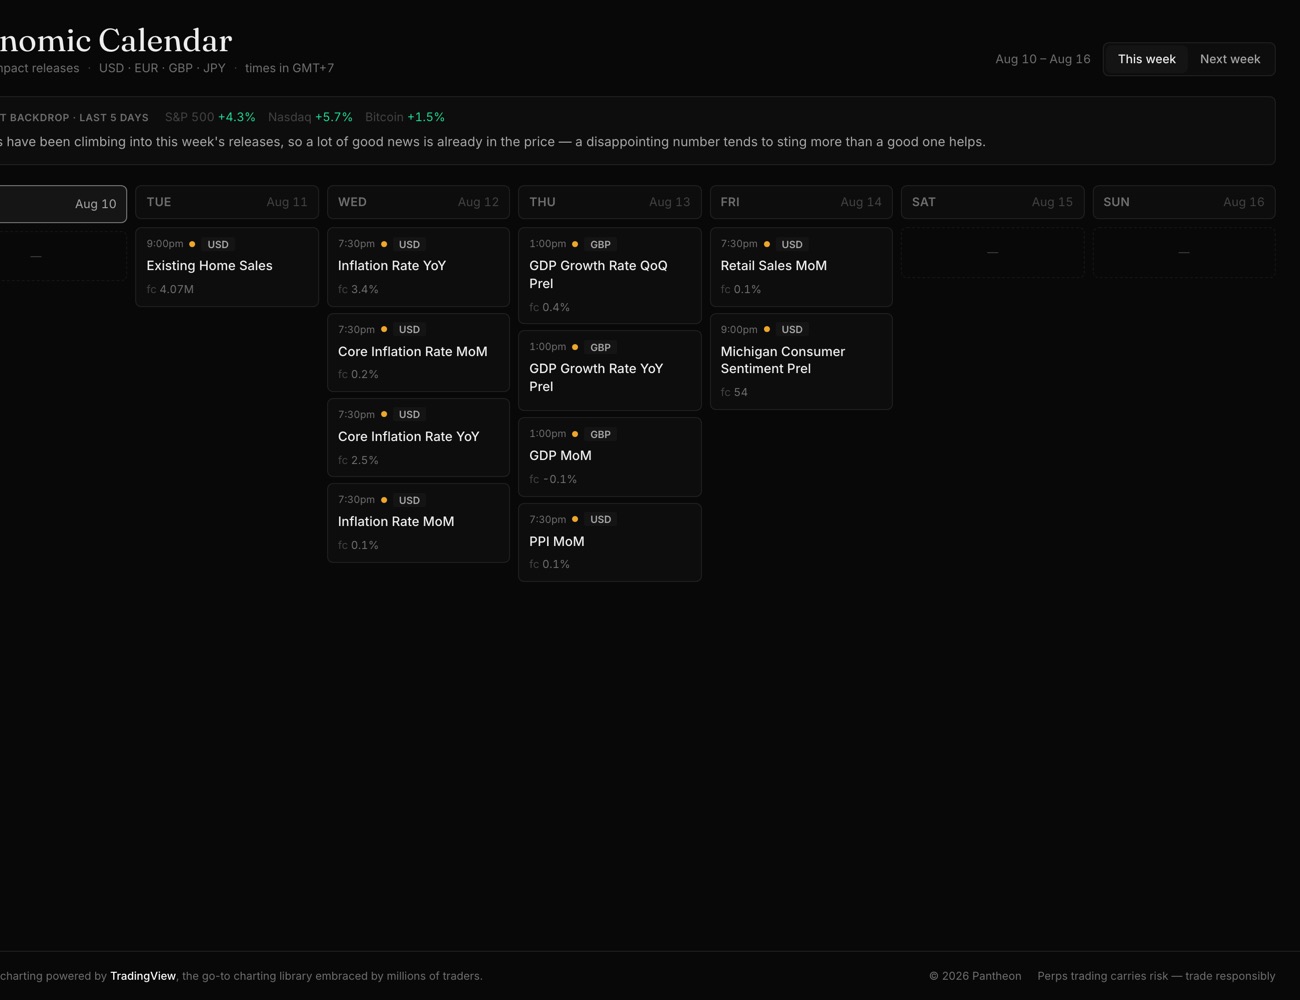
The rail counts down to the next high-impact macro release. When one is inside 30 minutes, two things happen: a one-time warning modal names the event and the pre-release risk (your dismissal is remembered per event, so a reload does not re-prompt), and an amber advisory row appears on the ticket with the event and the minutes remaining — spreads and slippage typically widen into a release. There is a single threshold, 30 minutes, for both.
The advisory never disables the submit button. The pill also separates an informed all-clear from ignorance: CLEAR means nothing is scheduled, TBD means high-impact events exist this week but their times are not yet published, and FEED DOWN means the calendar source is unreachable — nothing is being reported, which is not the same as a clear week.
Setup, funds and privacy
The submit button doubles as the setup ladder. Until your account can trade, its label is the next step — Connect Wallet, Deposit USDC, Enable Trading — and clicking it drives that step forward. A standard account whose USDC is sitting on spot gets one extra rung, Transfer to Perps, before Enable Trading; a unified account does not. Setup always wins over plan problems, so a $0 account sees "Deposit USDC", not "Position size is 0". Enable Trading is a session permission you sign once per wallet in each browser; a new device, cleared site storage or an expired session asks again.
How your balance is held depends on your Hyperliquid account mode. Pantheon follows whichever one you are in and never asks you to change it. You can read which one off the Account tab: a single Balance row and no Move control means unified; a list of pockets means standard.
Unified is Hyperliquid's default for new accounts. The USDC you deposit is one balance that backs crypto perps, stocks, forex and gold at the same time, and collateral is drawn as you trade — so there is no transfer step before your first trade, and no funding a market separately. Pantheon shows one Balance row and no Move controls; there is no transfer to make between markets. The flip side of one pool is that every open position leans on the same money: a loss on gold reduces what is holding up your BTC trade, and there is no second pocket to fall back on.
Standard keeps genuinely separate pockets — Perps, Spot, and each segregated market pocket. The Account tab shows one combined total-equity figure, then lists every pocket separately, and never blends risk or liquidation numbers across pockets: each pocket liquidates on its own numbers, a hot pocket's real risk could hide behind an idle balance elsewhere, and a position in one pocket cannot be rescued by cash sitting in another. Funding a market you have not traded yet means moving USDC into its pocket first, which is instant and free.
Deposits work the same way in both modes: anything below 5 USDC is blocked outright, because a smaller amount is permanently lost. Withdrawals carry a $1 fee and arrive in about 5 minutes.
Trading fees are one all-in rate charged on fills. The ticket shows no fee preview before submit, and none of this page's P&L or risk numbers include fees — they are ledgered separately and never count as risk.
Ghost mode is the screen-sharing switch: one tap blurs every account-money readout at once — P&L, loss budget, ticket risk and balances, the wallet address, the dollar amounts on chart pills. It is display-only and changes nothing about your orders; prices, percentages and R:R stay readable. Viewing a wallet your extension cannot sign for puts the page in loud view-only — the wallet pill turns amber and the ticket refuses to place anything until you switch back.
The footer's connection dot reports the real state of the market feed: anything other than Online means prices on screen may be stale. On reconnect the chart backfills the gap in candles and missed fills are replayed, so nothing is silently lost.
How to
Place a risk-sized trade
Pick the market with the pair button or Cmd/Ctrl+K.
Click Buy / Long or Sell / Short — the planner seeds an entry at the mid, a stop 1% away and a target 2% away.
Drag the entry, stop and target pills into shape, or type the prices; chart and ticket stay in sync.
Tag a strategy and grade the setup — the grade pre-selects a risk chip (A 2%, B 1%, C 0.5%).
Confirm or override the risk chip; the ticket sizes the position from it and the stop distance.
Submit. If a risk check fires, read the receipt — confirm past it in Locked In, or stand down.
Attach or move a stop and target
On a position with no bracket, drag the TP or SL chip from the chart's position pill to the price you want.
To move an existing leg, drag its pill and drop it at the new price.
To edit both by typing, click the TP/SL cell in the Positions table.
Scaling in or partially closing re-places both legs at the new size automatically — no action needed.
Once in profit, click BE to move the stop to entry, or arm Auto BE before entry to do it for you.
Take profit in legs
Before entry: turn on Scale out in the ticket, set 2–20 legs, and drag the High and Low rails to set the exit zone — the R:R bar switches to the average of the rails.
After entry: click + Scale on the chart's position pill, drag the rails, set the leg count, and apply.
Track progress on the Live trade bar in Positions — each rung is a hash mark, banked profit shows as Locked.
If you close the position from another application, clear leftover legs from Open Orders.
Add to or close a position
Switch the ticket to Manual Order — Smart Order is locked while a position is open on that market.
To add: pick Market or Limit, enter a size, submit.
To close part: tick Reduce only and use the slider — 100% is a full close.
To close everything in one action: click Close on the Positions row or the position pill's close button; residual protective legs are swept.
To reverse: close first, then open the opposite side — there is no flip control on a live position.
/start
Get started
The setup checklist: eight steps detected from real account state, with nothing to tick off by hand.
/start lists the eight things that have to be true before Pantheon's feedback loop can run a full lap: a connected wallet, trading enabled, a discipline mode, a written playbook, a real trade, a review of it, and a first read of your verdicts and your loss distribution. Nothing on the page is a checkbox. Each step is marked done by checking the thing itself — a working approval, a saved strategy, a real fill, a reviewed journal entry — and recomputed on every visit, so the page cannot record a completion that has stopped being true. Steps have no required order; the first incomplete one is highlighted as where you are, but you can do them in any sequence.
Completion is detected, not ticked
Every step derives its done state from evidence: step 1 from an active wallet, step 2 from a live check of your trading approvals, step 3 from the mode commitment held on your account, step 4 from your strategy library, step 6 from a journal entry carrying a review timestamp. Because the page re-derives everything on each load, a completion that stops being true un-ticks — an expired trading approval drops step 2 back to not-done instead of leaving a stale green light.
Steps never gate each other. If you connected a wallet before you ever found this page, step 1 arrives already ticked; if you want to trade before writing a playbook, nothing stops you. The one real dependency in the product is that Zen (step 3) requires a saved strategy (step 4), and that is enforced on the Zen button itself, not on the list.
Work done elsewhere counts for the account-backed steps — mode, playbook, review — which pick up what you did in another browser or on another device the next time the page loads. Enable trading is the exception: its session key lives in the browser that ran the approval, so each browser you trade from runs Enable Trading once. Enabling on a second device replaces the approval, which flips the first browser back to not-done until you re-enable there.
Day trader or swing trader
One question sits above the steps: how do you trade? It is answered with one tap and is framing only — Pantheon classifies every trade automatically by how long you held it, so no rule reads this answer and no enforcement changes because of it. It sets your default lens, nothing more.
If you trade both styles, use a separate wallet for each. Otherwise the two styles' statistics pool into one number that describes neither.
The answer lives in this browser and is mirrored one-way onto your account's wallet settings. It does not follow you: a new device shows the question unanswered, and answering there replaces the value previously stored on your account. In this browser you can re-tap to switch your lens any time, but once a value is on the wallet's settings it is not re-pushed.
Enable trading
Enabling trading is a one-time, per-wallet approval that makes order submission one click. Once it is done, orders are signed by a session key held in this browser — your main wallet never signs a trade, and Pantheon never holds funds or signs on your behalf. You run it from the order panel on /trade, and no signature is ever fired by a page load; every prompt is something you clicked for.
Expect three signature prompts on a wallet that has never been set up. The first two are the trading approvals; both are scoped to Arbitrum, where settlement happens, so a network-switch prompt mid-flow is expected and a wallet on the wrong network rejects them outright. After the "Trading enabled" confirmation, a third, plain signature links the wallet to your Pantheon account. It grants no trading authority and moves nothing.
The order panel's button routes you through anything that has to happen first. An account with no funds is routed to a deposit. On a unified account there is nothing further to route around — the balance you deposited into already backs every market. On a standard account whose USDC is sitting on spot, it routes you to a spot-to-perps transfer instead of a pointless second deposit. If a unified account is ever shown a transfer step, Pantheon could not read your account mode — reload rather than following it, because there is nothing to transfer. The deposit itself moves USDC already sitting in your connected wallet on Arbitrum — getting USDC into that wallet happens outside Pantheon.
One scoping rule worth knowing: if you set the wallet picker to watch a different wallet, your journal, performance and risk data follow the watched wallet — your strategy playbooks are account-wide and identical on every wallet; only their per-wallet trade stats switch. Signing never follows the watched wallet: the trading approval and every signature stay on the wallet you are actually connected as.
The step ticks off a read-only check that signs nothing. A full page load re-checks against the network, so an expired or replaced session key sends you back to "Enable Trading" rather than showing a completion that is no longer real.
Discipline modes: Degen, Locked In, Zen
Your discipline mode decides how loudly a risk violation is enforced. The three modes are not tiers and not paywalls — same features, same account, same data. Until you commit to one, Locked In is in force by default.
The commitment is held server-side against your account, not in a browser and not on a wallet. Clearing site data or opening a second device does not change it, and switching wallets does not switch your discipline in either direction — it follows the person.
Entering Zen is a deliberate act: the button opens a consent panel listing the rules you are agreeing to — hard caps on per-trade and total open risk, a stop-loss set at open on every entry, a lockout when same-day losses hit your daily limit, every entry tagged to a real strategy — the same list the trade page's mode section explains in full, with the exact numbers. Leaving is part of the terms: Zen lifts on a 6-hour rollover, never instantly. Zen stays locked until you have at least one active strategy carrying a rule, because Zen refuses untagged entries — entering it with an empty playbook would block every order behind a turn-off that takes six hours.
Switching is asymmetric on purpose. Tightening is instant. Loosening from Zen lands exactly 6 hours after you request it — flat, on every device, no midnight reset — and Zen stays fully in force until then. The countdown and the cancel control live on the trade surface's mode control; /start keeps showing Zen as your mode until the change lands, because that is what is actually enforced.
Control
What it does
Values
Degen
No platform gate. Violations pass silently; only a lockout you declared for yourself still applies.
One tap to commit
Locked In
Every risk violation is an interrupt you must acknowledge; nothing hard-blocks. In force by default before you choose.
One tap to commit
Zen
The only mode that refuses an order outright. Entered by explicit consent to its rules; leaving takes 6 hours.
Requires one active strategy with at least one rule
The strategy playbook
A strategy is a named setup with rules grouped under headings you choose — Trend, Location, Confirmation, Risk, whatever fits how you trade. The step ticks as soon as your library holds one.
Rules are a self-reflection taxonomy, not an automated filter. Nothing evaluates them at order time; you grade your own execution against them in the journal afterwards. Risk percentage and reward ratio are site-wide settings, never per-strategy.
The playbook gates two things downstream: Zen needs one active strategy carrying at least one rule, and tagging a trade needs somewhere to tag to. Any saved strategy ticks this step, but a rule-less or archived one still leaves Zen locked.
The entry risk gate
Your first trade completes step 5, and an open position counts — a trader whose first entry is still running is not left staring at an unticked step.
At entry, the gate reads three things: your planned risk against your cap, whether a stop is committed at open, and your total open exposure. How loudly it enforces depends on your mode — silent under Degen, an acknowledgeable interrupt under Locked In, a hard refusal under Zen.
What the gate never reads is your playbook's rules. Tagging a trade to a strategy records which setup you thought you were taking; grading conviction is your own read, captured at entry so it can be checked against the outcome later. Whether the rules were actually followed is yours to judge in review.
Trade review
Review happens on an individual trade's page, not on the journal list. Marking the trade reviewed stamps it and awards the review XP; saving notes on the trade does the same if it was not already reviewed. Either one completes step 6 — the step the rest of the list feeds, because a trade that is never looked at afterwards produces history, not learning.
Review state is honest in both directions: un-marking your only reviewed trade un-ticks the step. Journal entries are scoped to the active wallet and sync to your account, so your reviews survive a reload and a new browser.
Setup verdicts: marry, date, kill
Step 7 asks you to read your first verdicts on /performance: every setup with enough closed trades gets a Marry, Date or Kill, computed from your own results — keep trading it, keep testing it, or stop.
The floor is 3 closed trades per setup. Under three, results are variance, not edge, so the group still renders but is held at Date and labelled undertested — a lean, never a judgment. The thresholds behind each verdict, how trades group when tags are missing, and when a verdict is allowed to speak loudly all live on /performance.
The cost of over-sizing
Step 8 introduces the loss report on /performance: your closed losing trades, bucketed by how much of your account each one cost, read against your per-trade risk cap. The point is to see whether your damage concentrates above the cap.
The step counts done once you have 3 losing trades — fewer than three losses is noise, not a distribution. How the buckets are built, why winners never appear, and where the cap line sits are /performance's to explain.
How to
First run, start to finish
Answer the day/swing question — one tap, framing only, enforces nothing.
Connect your wallet from step 1 — MetaMask or any EVM wallet extension — then enable trading from the order panel on /trade (flow below).
Back on /start, commit to a mode: Degen or Locked In now, Zen once you have a strategy.
On /strategies, write down one setup you actually trade, with at least one rule — that rule is what unlocks Zen.
Take a trade on /trade: tag it to the playbook, grade your conviction, set the stop and the risk.
When it closes, open the trade itself in /journal and save notes or mark it reviewed — the step that closes the loop.
Enable trading — the one-time approval
Open /trade with your wallet connected and read the order panel's main button. It names anything that has to happen first — depositing USDC, and on a standard account whose funds are sitting on spot, moving USDC from spot to perps. A unified account goes straight from deposit to Enable Trading.
When it reads Enable Trading, click it. In the one-time dialog, check that the address bar reads exactly pantheonfi.com or app.pantheonfi.com — anything else, stop and do not sign.
Tick the terms checkbox and continue to sign.
Approve the switch to Arbitrum if your wallet asks — that prompt is expected.
Sign the approval requests — usually two, or one if this wallet was already approved — and wait for the "Trading enabled" confirmation.
Sign the third prompt that follows. It links the wallet to your account and grants no trading authority — but declining it silently stops your journal, discipline and XP recording while trading keeps working. If you declined it, the amber notice on the trade surface offers Verify — it re-prompts just this signature.
Commit to Zen
Save a strategy with at least one rule first — the Zen button stays disabled until one exists.
Click Zen on step 3 to open the consent panel.
Read the rules on the panel. They are the terms you are agreeing to, identical to those shown on the trade surface's mode control.
Click Commit to Zen — it takes effect immediately. Not now backs out with nothing changed.
To leave later, select Degen or Locked In. The change lands exactly 6 hours after you ask, on every device, and Zen stays fully in force until it does. Watch the countdown on the trade surface's mode control — /start does not show it.
/performance
Performance
How your closed trades are scored: the Pantheon Score, risk-cap analysis, strategy verdicts, and the clean-trade track to Elysium.
Performance is where your closed trades get scored. It reads your fills from Hyperliquid, slices them to a date window, and turns them into a Pantheon Score with its Performance and Discipline parts, an equity and drawdown picture, a risk-cap analysis of your losses, Marry/Date/Kill verdicts on your strategies, and your clean-trade streak toward Elysium. Everything on the page is computed from your own numbers — nothing is model-generated — and where something cannot be measured, the page says so instead of inventing a figure.
Data sources and the date window
The page reads your fills from Hyperliquid directly in your browser — Pantheon's servers never pull your positions. Two exceptions: third-party import history is fetched server-side on your behalf, and the Elysium clean streak is scored server-side from your fills, so the number you see is one the server will back. Equity — the denominator behind every percentage on this page — is the exchange's own account-value history for the tracked wallet, which counts perp balances and not idle spot holdings; other wallets never enter the math. On a unified account this figure is not the pooled balance the trade surface shows, and the two can disagree.
Your own history needs no import step: connect or watch a wallet and its full fill history loads. History from other venues is imported from the Profile page with a read-only API key — that surface is in limited release, so most accounts will not see it — and it arrives as bare fills: entries, exits and P&L, with no declared stops, strategy tags, leverage plans or conviction grades. That absence is why imported history scores Performance only; everything ticket-derived shows an explicit empty state instead.
With no wallet connected the page renders a sample dataset behind a banner so you can see what it does; connect a wallet and every number is your own. If you watch a wallet you cannot sign for, the page goes view-only and hides your personal progress strip — that strip is your account's state, not the watched wallet's.
The analytics sections share one date window. A trade is in the window if any part of its life overlaps it: entered before the window ends and exited — or still open — after it starts. The day-snapped ranges — 24h, This Week, YTD, custom and ALL — snap to UTC day boundaries; 7d, 30d and 90d roll instead, starting exactly six, twenty-nine or eighty-nine days before the moment you load the page and running through the end of today. ALL is the default and runs from your first recorded trade through today; a custom picker takes any start and end. The window is written to the URL, so a link reproduces exactly what you see. Three things ignore the range bar because they are account state, not window reads: the clean-streak count, the daily check-in and XP strip, and the news card.
The Pantheon Score
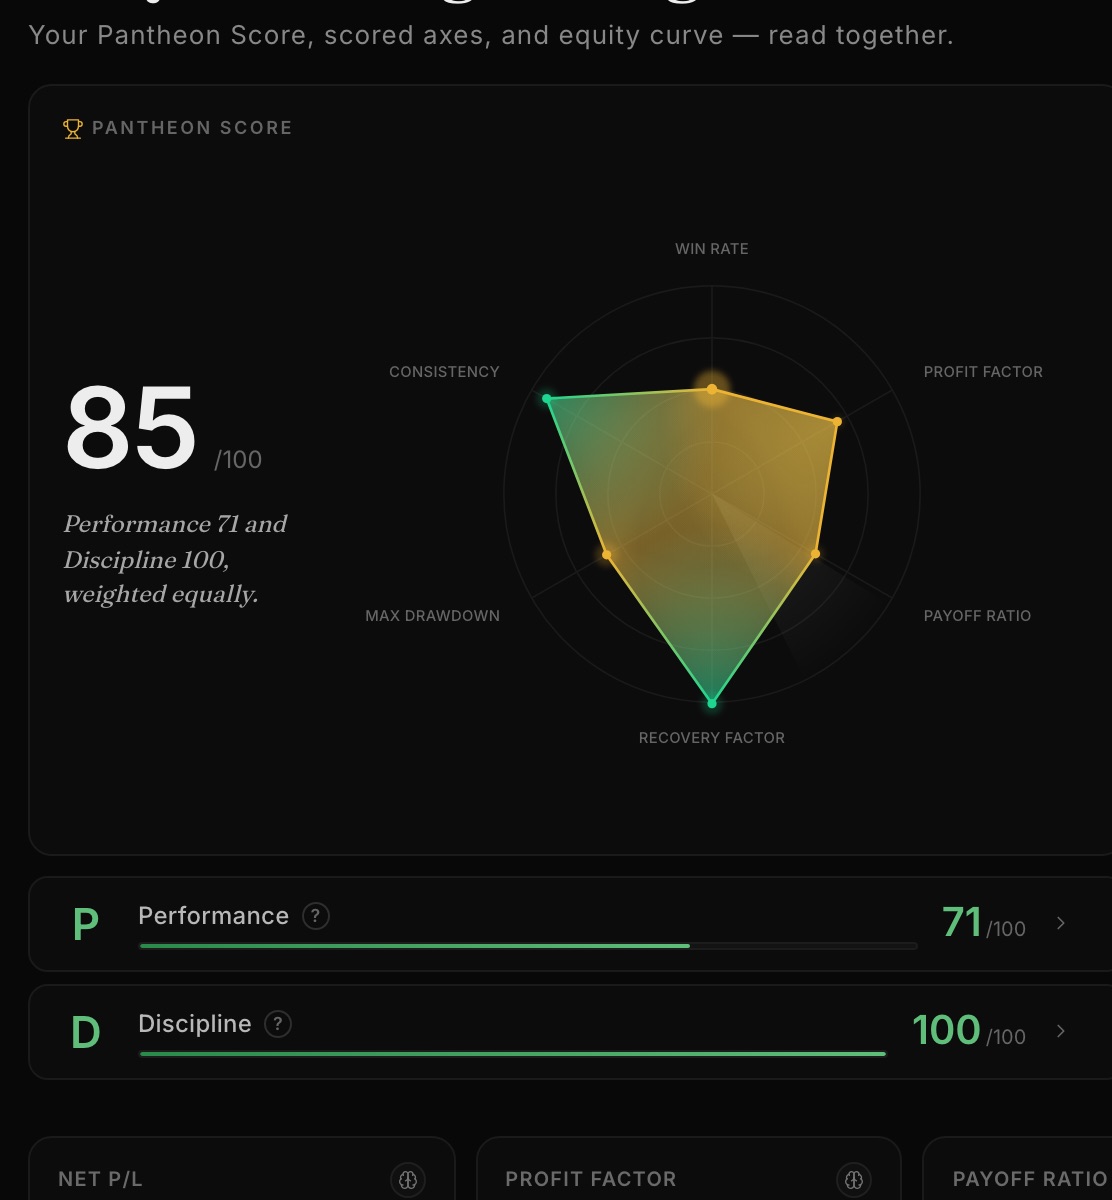
The Pantheon Score is a 0–100 blend of two separate scales, weighted equally: Performance — what your outcomes look like — and Discipline — whether you followed your own risk rules. Both parts always render beside the blend. They are kept separate because they answer different questions: a losing trader with tight process should see Discipline rising while Performance lags, and a winning trader breaking their own rules should see the gap, not an average that hides it.
The score never invents data. Performance exists from your first closed trade because it reads fills alone. Discipline is measured only from observable behavior on trades placed through Pantheon; when it cannot be measured it reads "—", and the Pantheon Score falls back to the one part that is measured instead of averaging against a guess.
Performance scores closed trades only — an open position never moves it. Zero closed trades in the window replaces the card with a prompt; one to nine closed trades shows the real numbers with an "early read" footnote rather than hiding them. Discipline is the exception: its two checks also read Pantheon positions that are still open, so a live trade's sizing and the stop it currently holds count as soon as they can be observed.
The delta chip compares this window to the immediately preceding window of the same length, and only appears when that prior window has trades. On ALL there is no prior window, so no chip.
The Pantheon Score card on the sample dataset: the blended 0–100 number, with Performance and Discipline always printed separately beside it — a wide gap stays visible instead of averaging away.
Performance scoring: the six axes
Performance is the mean of six axes, each scored 0–100 from your fills. Win Rate scores as the percentage itself. Profit Factor is banded: breakeven (1.0) scores 25, 2.0 scores 90, 3.0 and above scores 100. Payoff Ratio — average win over average loss — tops out at 3.0. Consistency measures profit concentration: a profitable window carried by one big day scores low, and on a losing window the same math runs on your losses and is capped at 50, so steady bleeding never reads green. Max Drawdown scores 100 at zero drawdown, roughly 68 at 10%, 50 at 18%. Recovery Factor is net P&L over your worst drawdown in dollars — 5× scores 100, and a net-negative window bottoms the axis out. Once you have a single winning trade, no axis sits at a bare zero: a 3-point floor keeps every axis visible, and a true zero means a window with zero wins.
Win/loss classification follows one rule: a trade that exits within a tenth of the risk you declared at entry is a scratch, not a loss — so trailing a stop to entry and getting taken out for a few dollars of fees does not count against your win rate. Trades with no declared stop use a ±$1 band instead. Win rate divides wins by decided trades only; scratches never count against you. One deliberate exception: the risk-cap analysis below counts losses in dollars, not in R — so a loss that scratches out of the win rate can still appear in the loss histogram. That is a design choice, not a disagreement; the risk-cap section explains why.
Drawdown is walked over your cumulative-P&L curve, not your account value — a deposit is never a peak and a withdrawal is never a hole. Depth is measured against your real account value at the peak.
Discipline scoring: sizing and stops
Discipline is two checks, each worth half. Sizing Adherence is the share of trades whose risk stayed at or under 2% of your equity for the whole time they were open — adds included. A trade entered with no stop automatically fails it.
Stops Honored asks one question of every trade that carried a stop committed at entry, winners included: did it close still holding a stop no wider than the one you committed? Tightening counts as honored. Even widening mid-trade and putting it back counts — only the stop in force at the close is judged, with a small tolerance. Two things fail it: closing while holding a wider stop, or closing with no stop at all.
R is your committed risk in dollars: the distance from entry to the stop you declared, times size. It is fixed at entry — everything on this page that speaks in R measures against that committed stop, not wherever the stop ended up. Sizing Adherence is the separate read that divides that committed dollar risk by your equity at open to judge it against the 2% cap.
Before your first Pantheon-placed trade, Discipline cannot be measured; the card shows the one signal readable from raw fills — your average realized loss as a share of the account, green at or under 2% — and says the rest starts with your first Pantheon trade.
Once Discipline is measured, two extra reads appear when closed Pantheon trades carry a declared stop or target and price data can verify them: whether moving stops to break-even at 1:1 would have saved or cost you, and whether exiting at your declared target would have beaten what you actually did. Both are informational and never scored.
Equity, P&L and the BTC benchmark
Equity plots your real account-value history — deposits, withdrawals and open positions included. The headline above it is deliberately not the change in account value: it is the window's P&L with transfers excluded, because a raw account-value delta would count a deposit as a gain. The percentage is computed against your capital net of the window's own P&L, so deposits stay in the denominator and gains do not inflate it.
P/L re-anchors the cumulative-P&L curve to $0 at the window start. Drawdown plots the distance below that curve's running peak — the same series the Max Drawdown axis reads, so the chart and the score can never disagree. Daily P/L shows one bar per trading day from closed trades, with your best and worst day called out.
vs BTC answers one question: would the same capital held in BTC have done better? It walks your starting capital forward by realized trading P&L and compares it to that capital in BTC, so your own deposits and withdrawals cannot make you look like you beat — or lost to — the benchmark. The tab only appears when real BTC price data loaded for the window; when the benchmark is unavailable the chart says so rather than drawing a fake line.
The short read pinned under the chart is labelled "Computed from your numbers": a fixed template filled with this window's actual figures. It is not written by a model.
The risk cap and where your losses land
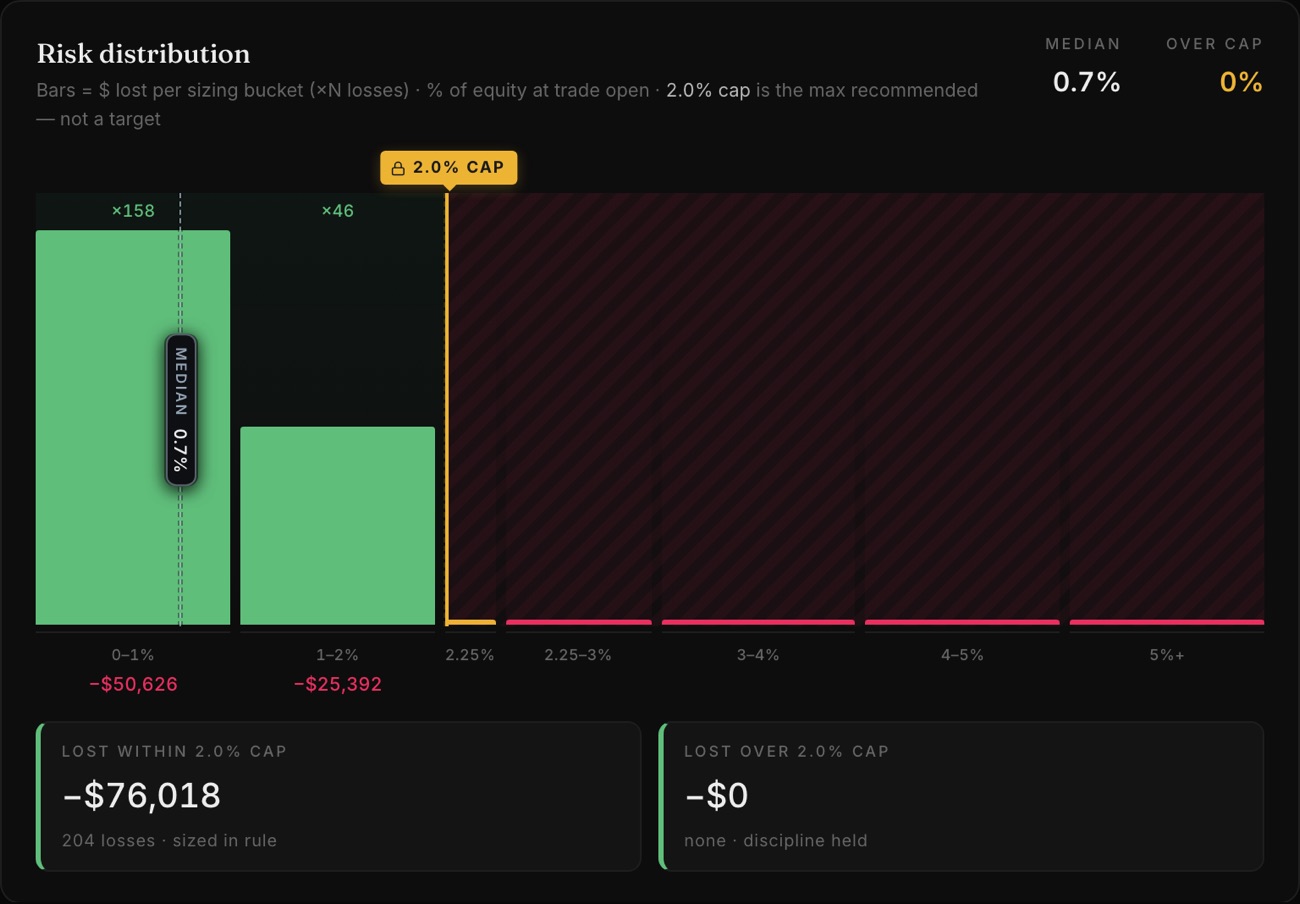
This section asks one question: how big were your losing trades relative to the account you had when you opened them? The cap is 2% of equity per trade — on a $10,000 account, no single loss should run past $200. The cap is fixed, not a setting: a cap you could raise would re-colour an oversized loss green and hand you control of your own measuring stick.
The verdict card states it plainly. If every loss stayed inside the cap, it says so and totals them. If not, it names how many ran past, what they cost together, and reconciles the counterfactual: what those trades actually lost, what they would have lost held to the cap, and the difference. The histogram beside it buckets losses by size, with bars sized by dollars lost rather than trade count — the question is where the money went. Click any bar to see exactly which trades are in it, worst first, with links to their journal entries.
A loss here means dollars — anything past a ±$1 band — not the ±0.1R scratch rule the win rate uses. That is deliberate: this section measures how big you were when you lost, and dividing a loss by the risk you declared would shrink a big-dollar loss under a huge stop to a fraction of an R and drop it from the chart — hiding exactly the oversized trade the section exists to expose. So its loss count can differ from the win-rate card, by design.
One exception: a stacked-zone scale-in you declared up front — one ladder of entries, one stop below the whole range — is judged against a 2× allowance, and when any trade in the window used it the copy says "your risk limit" instead of naming 2%, because the threshold genuinely was not 2% for those trades.
Only losing closed trades are bucketed: a winner's risk sat wherever its stop was, which cannot be known without a declared stop, so winners are excluded by construction. Below the histogram, Win rate by risk asks whether risking less actually wins more, using the risk each trade was committed with at entry. It stays locked until 8 trades carry a committed stop, and it only calls a difference at 5 points or more — anything less means risk size is not moving your hit rate.
Dollars lost per sizing bucket with the 2% cap marked. Losses split into sized-in-rule vs over-cap — here every loss stayed inside the cap.
Strategy verdicts: Marry, Date, Kill
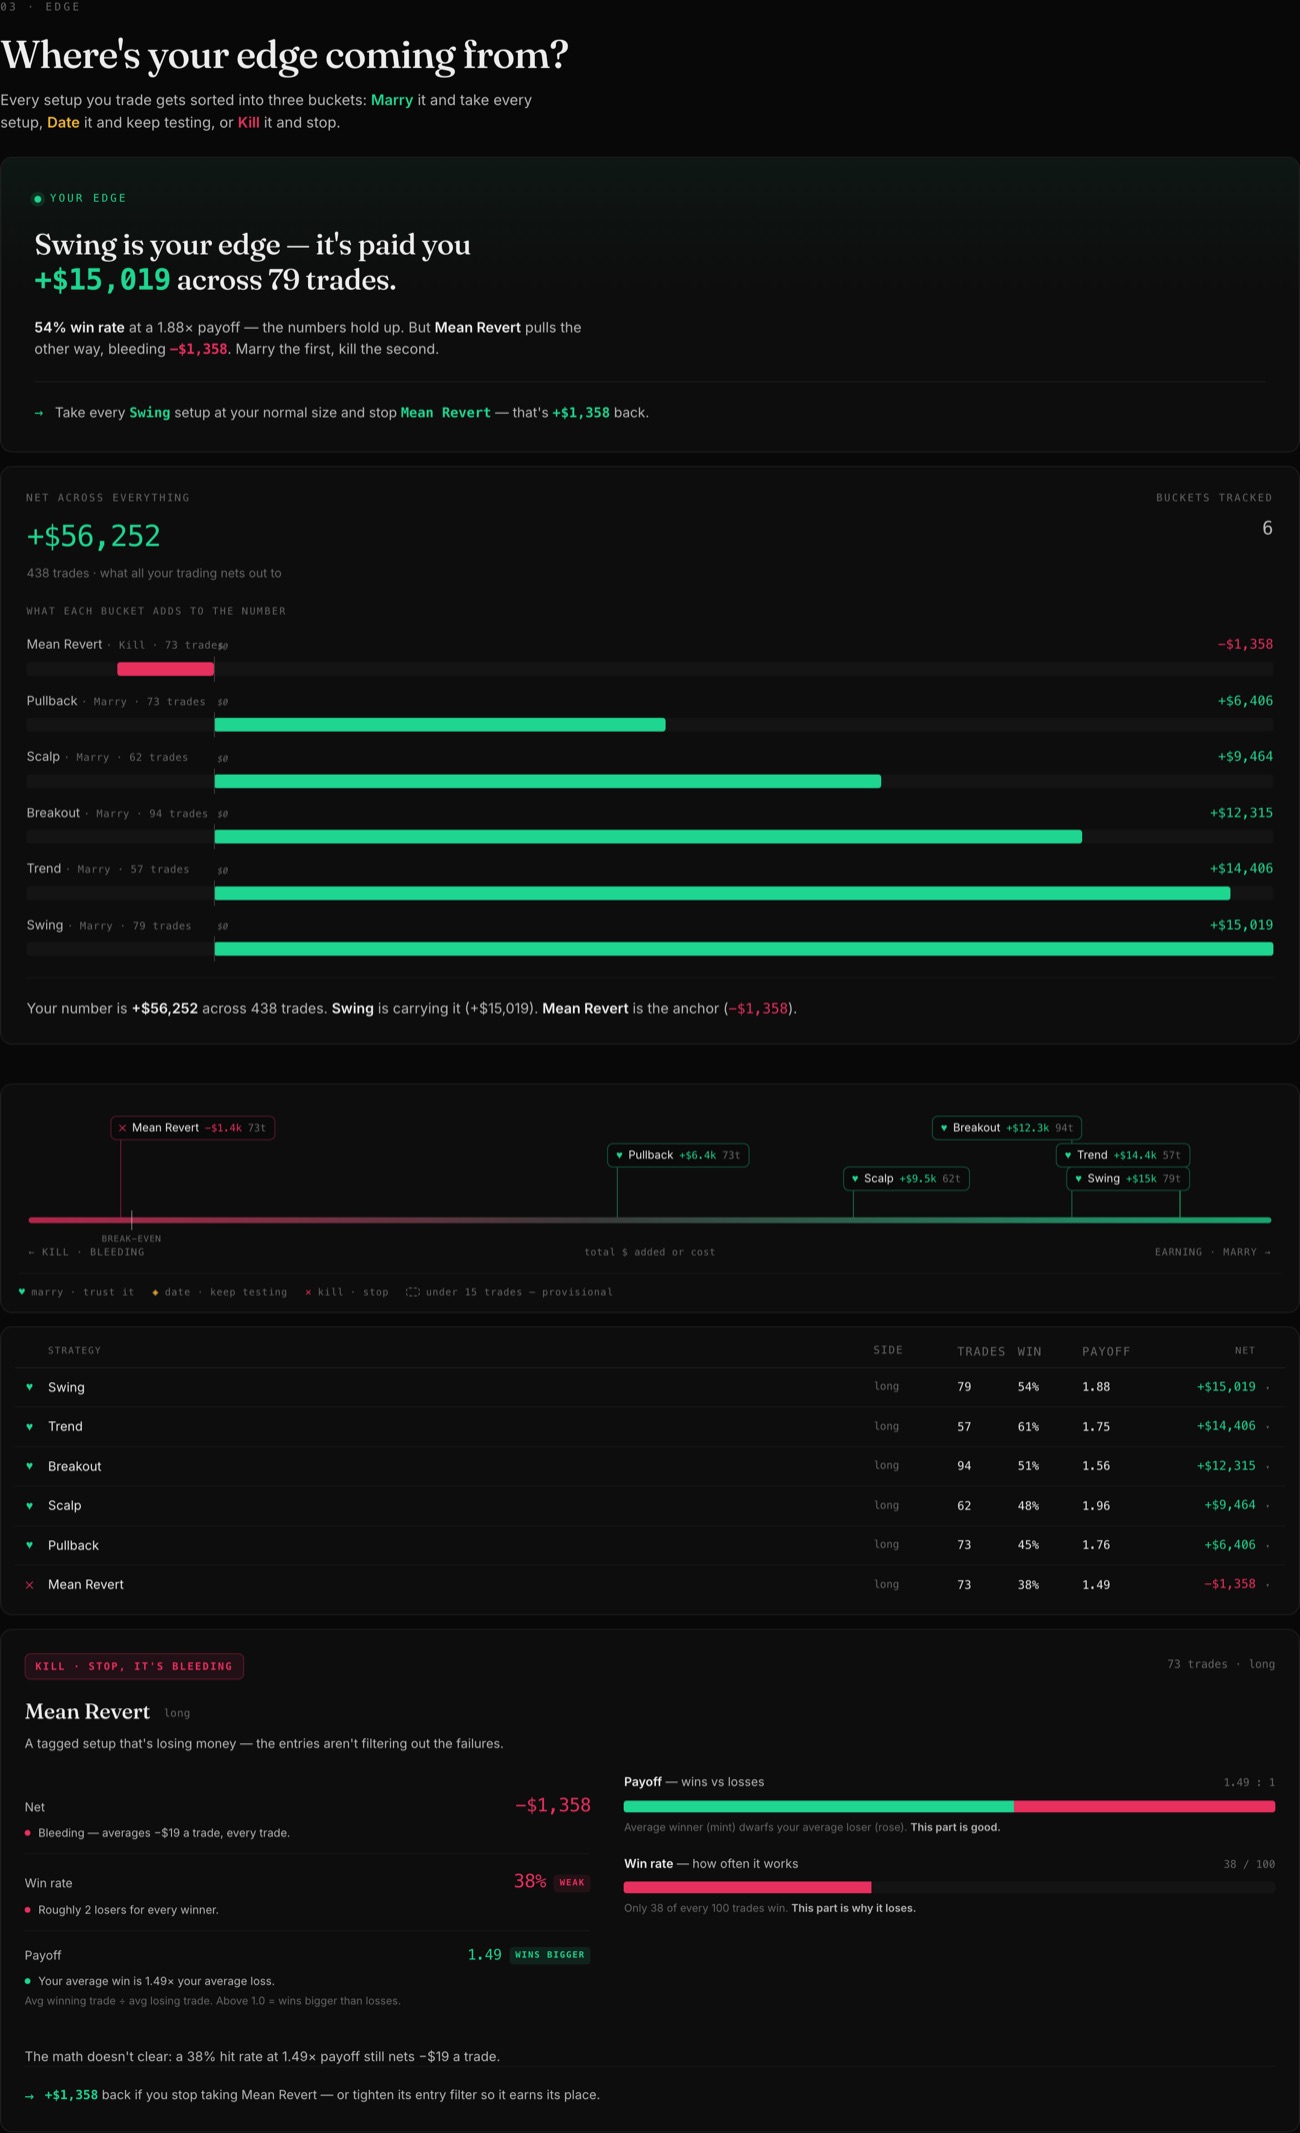
Every setup you trade gets one of three verdicts. Grouping is by your strategy tag; untagged trades collapse into a single Experimental bucket — those are not a strategy, they are trades placed without a plan. If none of your trades carry a tag, the section falls back to grouping by asset and says so.
Verdicts come from expectancy measured against the group's own average loss. Below 15 trades any verdict is labelled a lean, not a call, and loud instructions — "stop taking this for 30 days", "take every setup it gives you" — only fire at 15 trades and up. Nothing is dropped for being small: a one-trade group still renders, because hiding it would make the section's totals lie. Kill cards also show the dollars you get back by stopping.
Three context reads follow the same honesty rules. Direction (long vs short) needs 20 trades before it says anything, and when one side pays while the other bleeds it is framed as a setup gap on the losing side — direction is not a strategy. Conviction reads the A/B/C grade you picked on the ticket before entry (A high conviction, B decent setup, C maybe-trade) and shows what your graded book would have netted taking A and B setups only; imported fills carry no grade. Trades around news reads a stamp recorded at order time — whether the entry landed within 30 minutes of a high-impact release — needs 5 stamped entries inside that window before reading a pattern, and reports counts, never dollars. Entries from before stamping existed are excluded rather than assumed clear of news.
Every setup bucket priced in dollars across the sample: the callout names the bucket carrying the edge, and each row gets its verdict.
Control
What it does
Values
Marry
Proven edge — take every setup it gives you.
Expectancy at +0.20 of the group's average loss or better, with positive P&L
Date
Keep testing — not enough evidence either way. The only verdict a group under 3 trades can hold, because that is variance.
Everything between the Marry and Kill thresholds
Kill
Stop trading it — the card names whether the win rate or the payoff is the failing half.
Expectancy at −0.10 or worse, or negative P&L with 8+ trades
Sessions and the trade calendar
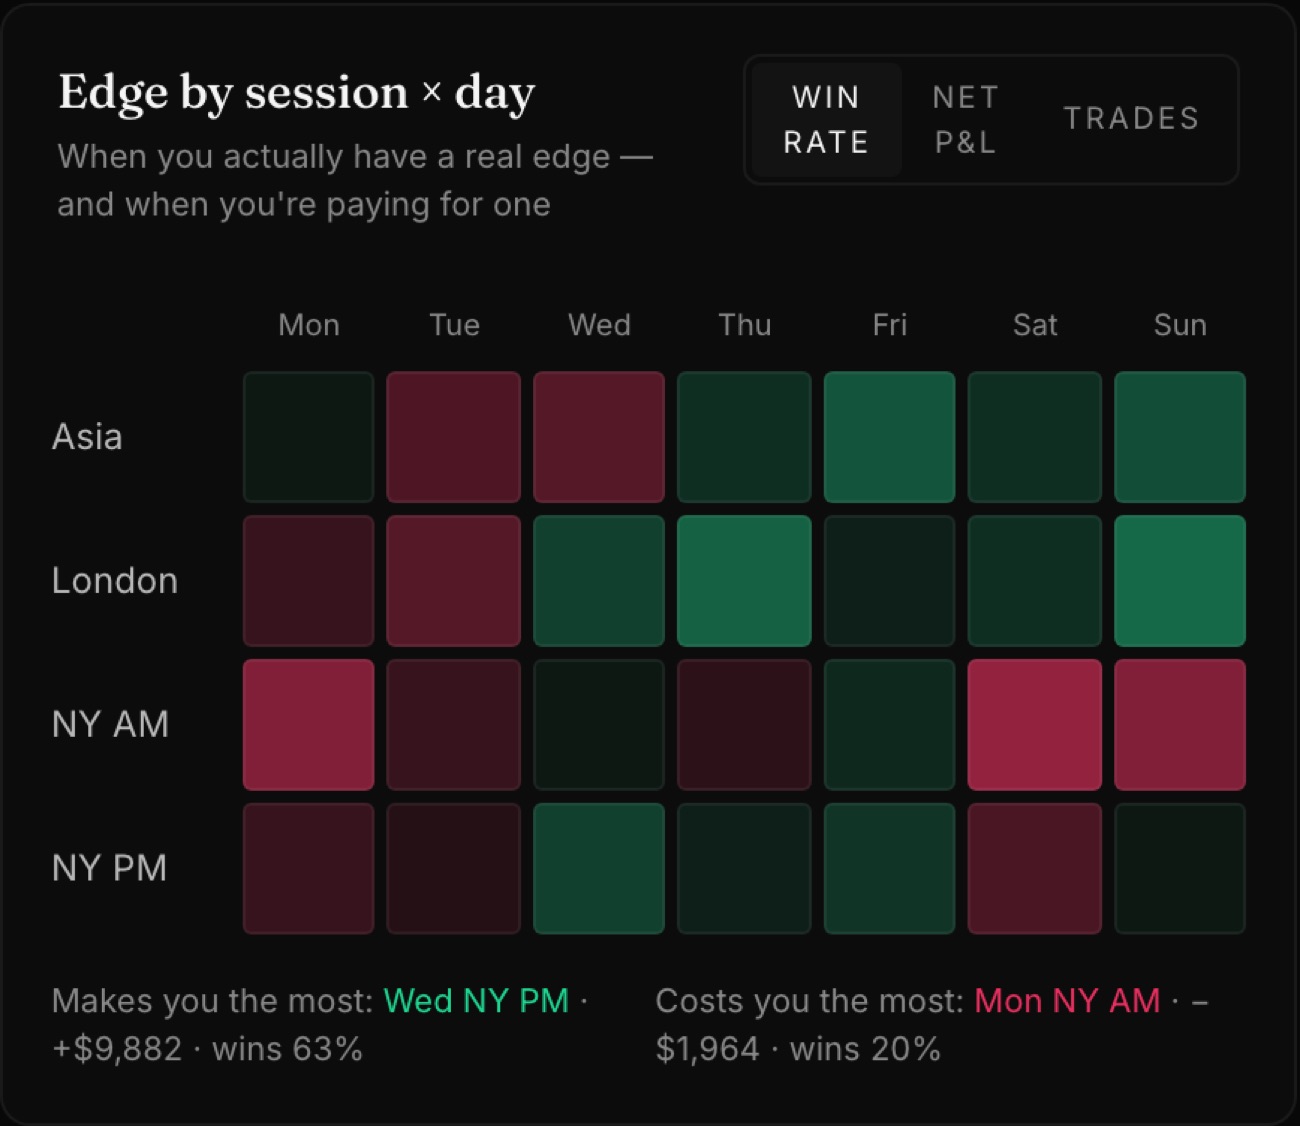
The session heatmap places every trade by its entry time (UTC) into one of four sessions across the seven weekdays, then colours cells by win rate, net P&L or trade count. Intensity scales to the largest cell in your own matrix, so the read is the same at any account size. The footer names the cell that makes you the most and the one that costs you the most, ranked by net dollars and ignoring any cell with fewer than 3 trades — one lucky trade cannot hijack the headline.
The calendar is a month grid coloured by daily P&L, with weekly totals down the edge. It aggregates the trades in the current date window, not your full history — days outside the window draw empty even if you traded heavily then. Set the range to ALL before stepping back through months.
Weekends carry real data: the venue trades around the clock, and dropping Saturday and Sunday would falsify week and month totals. Untraded weekend days are simply dimmed.
Edge by session × day: green cells are combinations that have paid, red ones that have cost.
Control
What it does
Asia
Entries before 07:00 UTC
London
Entries 07:00–12:00 UTC
NY AM
Entries 12:00–16:00 UTC
NY PM
Entries 16:00 UTC onward
Clean trades, Elysium and XP
A clean trade is sized inside the risk cap (adds included), carries a real strategy by the close — declared on the ticket or tagged afterward in the journal — closes without a widened stop, judged by the same final-state rule as Stops Honored, and is not a revenge entry: one you tagged as revenge, or entered within 15 minutes of a losing exit with a loss among your last three closed trades. The full definition lives on your profile. Twenty clean closes in a row opens Elysium, which doubles all XP for as long as you hold it. Break a condition and the streak resets — the banner names the trade, the date and the cause, so you know exactly which habit broke it.
The streak is scored on the server from your fills, so the count you see is one the server will back. Until that first answer arrives, the section says it is setting up rather than showing a provisional number.
Daily check-in is a once-per-day claim worth 10 XP, with a flame counting consecutive days. Check-in days belong to your account, not the browser — a day claimed anywhere is claimed everywhere you sign in.
Your live XP multiplier is whale tier × Elysium. Whale tier climbs with lifetime volume traded through Pantheon and never falls; inside Elysium the two multiply, so Dolphin's 1.1× becomes 2.2×. Levels and tier titles — Initiate through Deity — derive from your total XP.
Control
What it does
Values
Minnow
Starting tier
1.0×
Dolphin
$1M lifetime volume
1.1×
Shark
$10M lifetime volume
1.25×
Orca
$50M lifetime volume
1.5×
Whale
$100M lifetime volume
1.75×
Leviathan
$250M lifetime volume
2.0×
How to
Check whether your losses are sized correctly
Set the range to ALL, or a window long enough to hold a real number of losses.
Read the Avg risk / trade tile — at or under 2% is in rule; past 2.25% is oversize.
Read the risk verdict card: how many losses ran past the cap and what they cost together.
Compare the two money pools under the histogram — dollars lost inside the cap versus over it.
Click the tallest red bar and open the worst trades' journal entries from the list.
Decide which setup to stop trading
Open the strategy section. If the fine print says your trades carry no tags, tag your entries first — the ranking is by asset until you do.
Read the verdict hero for the one-line call.
Scan the spectrum: pins left of break-even are costing you money, and a dashed outline means fewer than 15 trades — treat it as a lean.
Open any Kill row and read whether the win rate or the payoff is the failing half.
Note the dollars you get back by stopping — that is the bleed you recapture.
Read the Pantheon Score without fooling yourself
Read the number, then the line under it — it names both parts.
Compare P and D. A high P over a low or missing D means your outcomes are ahead of your process.
Expand P to find which of the six axes is dragging.
Expand D to see whether the problem is sizing or stops — a low Stops Honored means trades closed on a widened stop or no stop at all.
Trust the delta chip only for what it is: this window against the immediately preceding window of the same length.
Push your clean streak to Elysium
Read your current count against the 20-trade gate.
Check the four conditions: sized inside the cap, a real strategy on the trade by close, no widened stop at the close, not a revenge entry.
If the reset banner is up, read the cause of the last break — that is the habit to fix.
Place trades through Pantheon with a declared stop and a strategy tag; imported fills cannot count.
At the gate, every XP event doubles for as long as the streak stays clean.
/leaderboard
Leaderboard
An anonymous ranking of Pantheon traders — rows carry no identity, the figures are exact, and only you can see which row is yours.
The Leaderboard ranks Pantheon traders on three metrics: 30-day trade volume, total trade volume, and XP. It is a ranking, not a directory — every row is anonymous, ranking happens on the server, and the only row that can be tied to a person is your own, marked "you" in your copy of the page alone. Loading the board requires a signed-in session, and the board lists every qualifying trader from the first one on.
Ranking metrics
The board ranks every qualifying trader on one metric at a time. The tab you pick sets both the sort order and the single figure shown per row; switching tabs re-sorts what is already loaded.
Volume is notional — price times size, summed across fills per wallet. The 30-day tab uses a rolling window ending at the moment you load the page, not a calendar month, so the figure shifts between loads as old fills age out of the window.
XP rank uses the XP total recorded for your wallet on the server — a number your browser computes is never accepted as rankable. The total is recorded when you visit /performance with that wallet connected; until you have done that at least once, you are unranked on the XP tab. XP itself is account-scoped — one total across every wallet and every device — so what gets recorded for a wallet is your account's total at that moment: rank several bound wallets and each carries the same account total, as of its own last recording.
A trader with no activity on the selected metric — no volume in the window, or no XP recorded — is unranked on that tab, sorts to the bottom, and shows — instead of a figure.
The board is computed fresh on every load — no response is cached at any hop. Volume reflects whatever fills are recorded at that moment: fills are captured as they happen, and a sweep every five minutes catches anything missed. The XP figure moves only when a newer total is recorded for the wallet.
Control
What it does
Values
Trade Volume · 30d
Rank by notional traded in the rolling trailing 30 days.
Default tab
Trade Volume · total
Rank by notional over the wallet's entire recorded fill history, no time window.
—
XP rank
Rank by the XP total recorded for the wallet on the server.
—
Anonymous rows
Every row reads "Anonymous." The server publishes no wallet address, no fragment of one, no pseudonym, and no identifier that persists between page loads. The only things a row reveals are its rank and its figure.
Ranking happens on the server, over the same exact figures the rows display. Ranks are strictly sequential — two traders with identical figures get adjacent ranks, never a shared one.
Because rows carry nothing stable between requests, you cannot follow a specific trader from one load to the next. Within a single load, though, the tabs re-sort the same rows — one trader's three ranks and three figures travel together, so what resets the trail is the load, not the tab. The board publishes an ordering, not a set of trackable profiles.
There is no opt-out: every qualifying wallet appears, with one exception — Pantheon operator wallets, covered under "Who appears on the board" below. What appears, though, is a rank and a figure tied to no name — the board's privacy model is that a row never carries an identifier, not that you can remove it.
Exact figures
Every figure on the board is exact. The number a row shows is the same number the server used to compute its rank — formatted server-side and sent as a display string, with nothing rounded, bucketed, or truncated on the way to your browser.
Volume reads in dollars and cents — $2,500,000.00, not "$2.5M" — and XP reads as a whole number. Because figure and rank come from the same server-side value, they always agree: reading down a ranked column, the figure never moves the wrong way.
— means absence, not zero: nothing recorded on that metric, or nothing usable. It is never $0 and never a figure too large to show.
Control
What it does
Values
Volume figures
The format on both volume tabs: exact notional in dollars and cents.
$2,500,000.00 · — when nothing is recorded
XP figures
The format on the XP rank tab: the recorded total as a whole number.
12,500 · — when nothing is recorded
Your row
Your own rows carry a "you" tag. The match is made on the server against the wallets bound to your account — a wallet becomes bound when you prove ownership with a one-time signature, which happens as part of enabling trading. The mark exists only in the copy of the board served to you; nobody else's page shows which row is yours.
If several of your bound wallets are on the board, every one of your rows is marked. The board ranks per wallet, not per account.
If the identity lookup fails on a given load, the board still renders with nothing marked, and a line under the table says your row could not be identified. The page never guesses and never falls back to matching anything stored in your browser.
Who appears on the board
Every wallet with at least one recorded fill qualifies. There is no volume or XP minimum, and no fixed minimum crowd — the board lists whoever is trading, from the first qualifying trader on. The count is per wallet, not per account.
A minimum-traders threshold still exists as an operator control, set to one by default. If the operator raises it and the board falls short, the response contains zero rows — they are never built, not merely hidden — and the page says the board is sealed, naming the threshold actually in force.
Wallets belonging to Pantheon operators appear only on the operator's own board. Every other viewer's board is built as if the wallet did not exist: the row is removed before ranking, so ranks stay a contiguous 1-to-N with no gap where it would have sat — a gap would itself disclose that someone is there. On the operator's own board, the row appears and ranks like any other.
If the operator screening itself cannot complete, the board refuses to load at all — it shows a temporary-unavailability message rather than risk publishing a row it is supposed to keep off your board.
Why rows carry no identifier
The rule behind the whole page: nothing published may name your wallet. The server sends no address, no fragment of one, no pseudonym, and nothing stable enough to follow from one load to the next.
An earlier design broke that rule. It keyed rows by the last characters of the wallet address, and the fragment worked as an oracle — anyone holding a candidate address could compute its ending themselves and check the board for a match, turning the page into an answer to "does this wallet trade at Pantheon?" Shortening the fragment would not have helped, because the attack runs from the address to the row.
What replaced it publishes ranks and figures tied to nothing. Both come from exact values held on the server; the single field derived from an address is the you-mark on your own row, delivered solely to you. One caveat worth stating plainly: per-address volume is publicly visible on the venue where orders execute, so an exact figure is information a determined observer could try to cross-reference. What the board guarantees is that it never publishes the link itself.
How to
Find your own row
Sign in and open /leaderboard from the sidebar.
Make sure a wallet is bound to your account — binding happens with a one-time ownership signature when you enable trading.
Pick a tab. Your rows carry the "you" tag; every other row reads "Anonymous."
If nothing is marked and a note says your row could not be identified, reload — the lookup failed on that request, not your membership.
If nothing is marked and there is no note, you have no bound wallet or no qualifying activity on that metric yet.
Get ranked on XP
Connect the wallet you want ranked.
Open /performance and let it load — that is where your XP total is recorded for the connected wallet.
Return to /leaderboard and open the XP rank tab.
Until a total has been recorded, your XP reads — and you are unranked.
Repeat with each wallet you want ranked — the board ranks per wallet, and each wallet's row carries your account total as of its last recording.
Read the board correctly
Check which tab is active — the figure column always belongs to the selected metric.
Figures are exact — volume in dollars and cents, XP as a whole number — and they are the same values the ranking uses.
Rank and figure always agree; two traders with identical figures get adjacent ranks, never a shared one.
Read — as nothing recorded on this metric. It is not $0 and it is not a very large number.
/journal
Journal
Post-trade review: closed trades joined to the plan they were fired under — risk math in R, an ungameable discipline verdict, and your own tags, grades and notes.
The Journal is where you review what you already did. /journal lists the closed trades of the active account; clicking one opens the full review — the trade's risk math, execution and costs, a chart with every fill drawn on it, an analysis of the plan versus what actually happened, and your own tags, grades and notes. The review runs on a plan Pantheon captures silently at the moment you place an order. The capture stays in the browser that placed the trade — which is why the entry side can never be rewritten after the fact, why the plan-based verdicts appear only where the trade was placed, and why imported history gets everything except them. Your annotations are private to your account and follow you between browsers when you are signed in.
The three-layer journal
Pantheon journals in three layers so that process is recorded before the outcome is known. You define a strategy playbook in advance (rules, plus an optional max-risk rule), you commit a plan at the moment you fire an order, and you review here after the close. The Journal is the third layer.
The plan is captured automatically at submit: which strategy was armed (or none), your declared stop and target, your planned size, and your account equity at that moment. Your entry grade — an A/B/C read on the setup — commits at the same moment. Nothing on this page can rewrite the entry side later. That is the point: the review compares what happened against what you said before you knew.
Whether a trade has a plan comes down to two things: it was placed through Pantheon's own ticket, and you are reviewing it in the browser that placed it — plan capture is device-local for now and does not sync to your account. Arming a strategy is not required: every fully placed Pantheon order gets a plan; a partial placement does not, because a partial whose failed leg was the stop has no declared stop worth recording. Imported history and trades placed on other frontends still get the full stats, chart and price analysis; what they cannot get is a risk verdict or a plan comparison, and the page says so instead of inventing a plan.
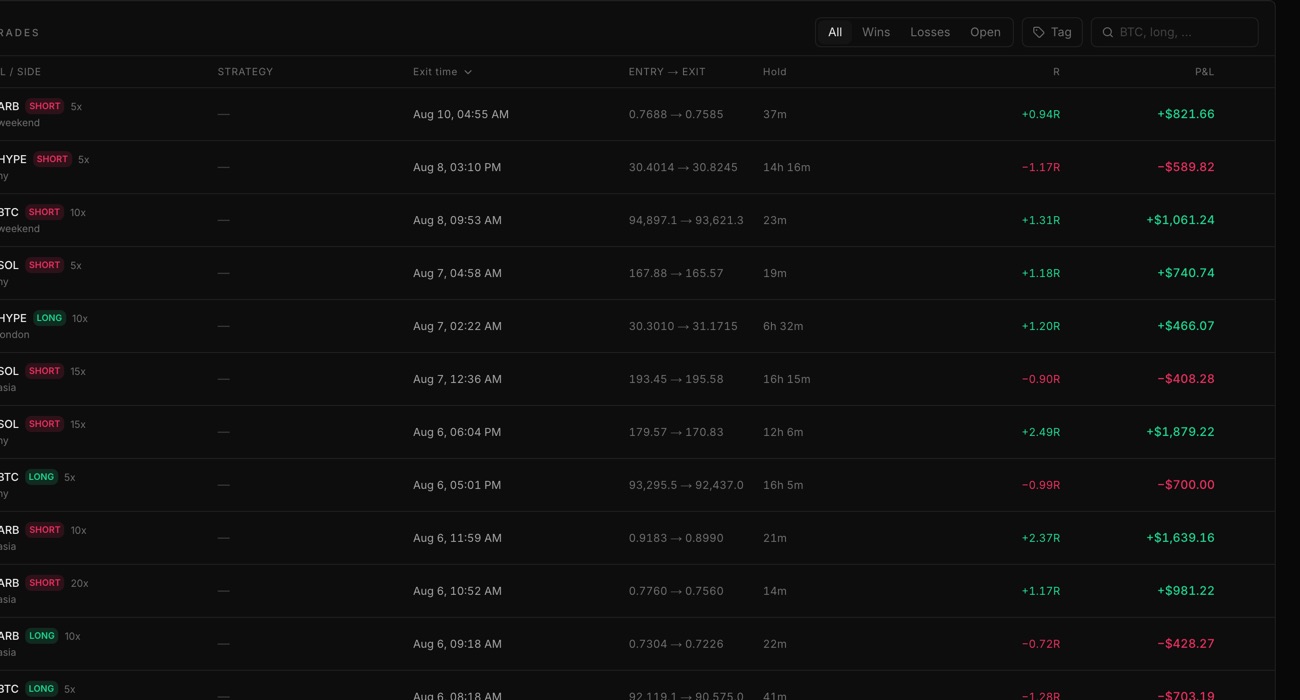
The journal ledger: every closed trade with side, leverage, session, hold time, R multiple and P&L.
R: results in units of declared risk
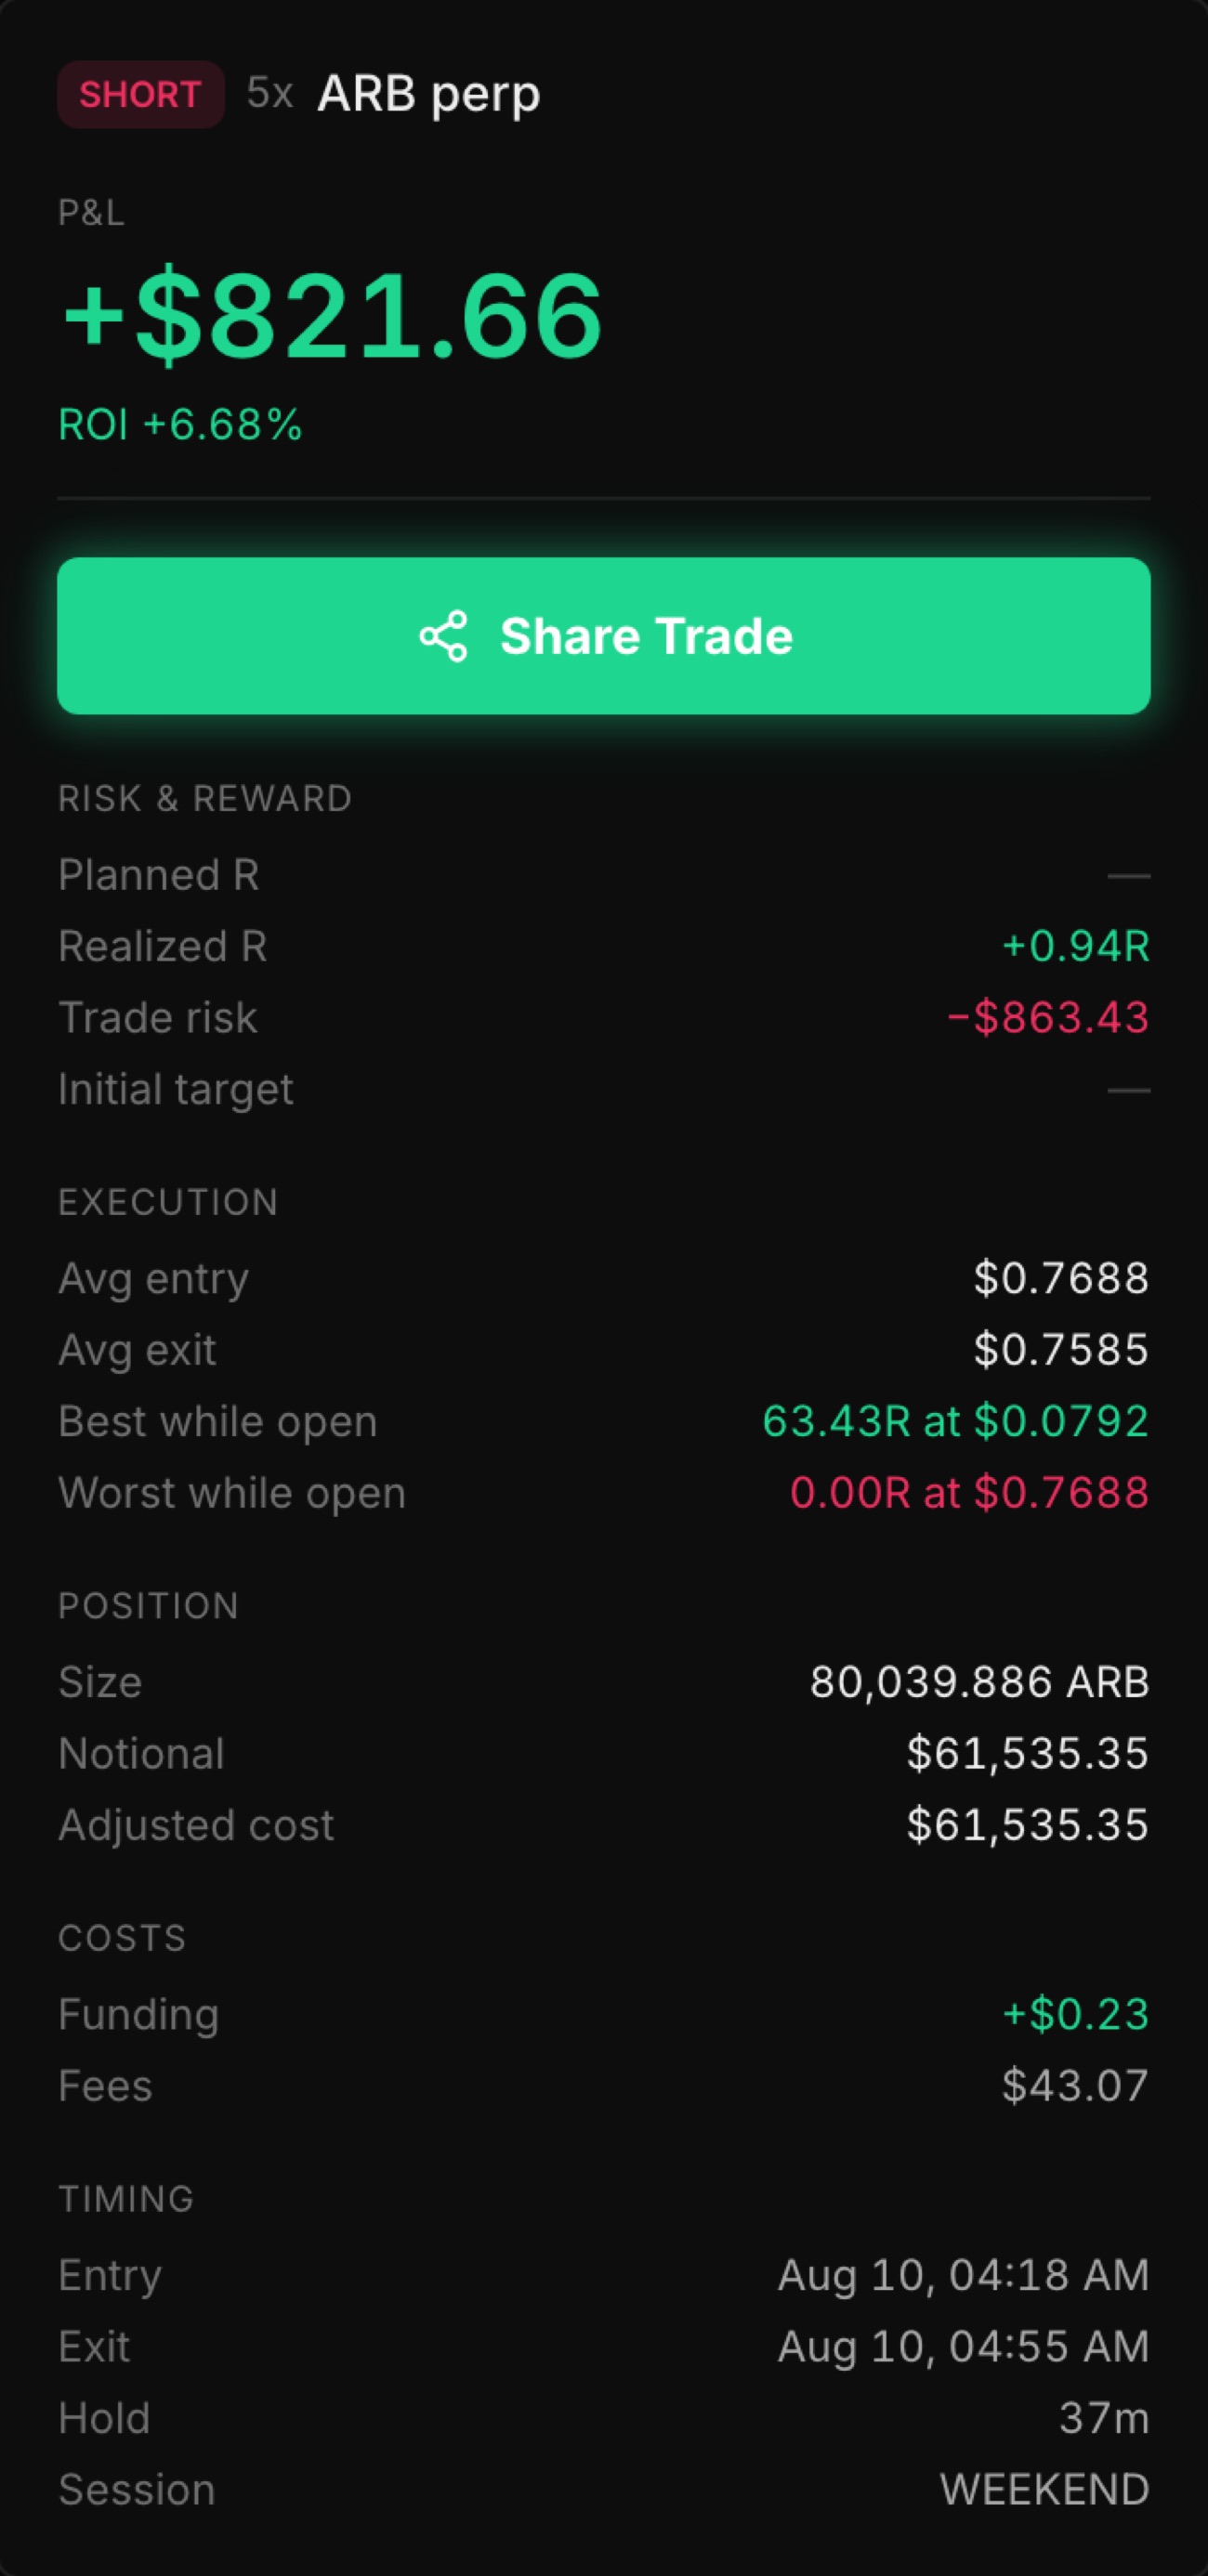
R expresses a result in units of the risk you declared at entry. One R is the dollars you stood to lose at your stop: the distance from your average entry to the declared stop, times your size. Risk $100 and make $250, that is +2.5R; a full stop-out is −1.0R.
Planned R is the reward-to-risk of the plan itself — declared target distance over declared stop distance; it needs both a declared stop and a declared target. Realized R is what you actually got, measured against the same declared risk. A trade with no declared stop has no risk unit: R shows a dash, and it is never estimated after the fact.
The trade page also shows trade risk (the dollars the plan put at risk) and initial target (the dollars it aimed at), plus best and worst while open — how far the trade ran for and against you while you held it, in R wherever a risk unit exists. Average entry and exit are volume-weighted across every fill; on a scaled-out trade that is the number that reconciles with your P&L, not the last fill's price. A trade here is one flat-to-flat lifecycle in one market: it opens when your net position leaves zero and ends when it returns to zero; every add and partial in between belongs to it, and a flip that crosses through zero without resting flat does not start a new one.
ROI is the price result over the margin committed at entry — but only when your leverage was captured at submit. Imported trades carry no leverage, default to 1x, and show unleveraged return on full notional. The 1x chip is the tell.
One trade's record: +$821 was +0.94R against $863 of declared risk. Planned R stays blank when no target was declared at entry.
The risk-discipline verdict
An ungameable check computed from your own orders and fills against the plan you declared. It runs wherever a plan was captured: a Pantheon-placed trade with a declared stop, reviewed in the browser that placed it — whether or not a strategy was armed. When a strategy was armed it checks the strategy's max-risk rule too.
The core rule: risk-reducing actions are never penalized. Tightening a stop, trailing to break-even, taking partials, closing early — always fine. Only risk-increasing actions count against you.
Severity is banded on how far past plan the action went: up to 1.5× is minor, up to 2× is major, beyond that severe. A 5% tolerance band around the plan absorbs slippage and noise, so a fill a hair past your stop reads as honored. One deliberate exception: a loss running past plan is always graded minor, whatever the size, because a gap through an honored stop cannot be told apart from a stop that was removed — the evidence line flags the ambiguity instead.
When nothing tripped, the card reads "Risk honored — you stayed within the risk you declared," and prints your planned versus realized risk as percentages of your equity at entry.
Control
What it does
Values
Widened stop
You loosened your stop beyond the plan.
Banded minor / major / severe by how far past plan
Added past cap
You added size beyond the risk cap.
Banded minor / major / severe
Loss exceeded plan
The realized loss ran past the declared risk or the strategy's cap.
Always minor — a gap through a stop is indistinguishable from a removed stop
No stop, over cap
No stop was declared and the loss exceeded the strategy's max-risk cap.
Banded minor / major / severe
Exit analysis
Hindsight about price — descriptive, never a conviction. The chart opens on the daily timeframe every time, so every trade gets the same big-picture read before you drill down; your volume-weighted average entry and exit are drawn as locked lines, and every fill is marked — hover one to see exactly what executed, which matters where a partial cover and a full close look identical.
The judgment window is proportional to your own hold: price is examined for one hold-length past your exit, floored at 20 analysis bars for very short scalps, so a two-hour scalp is never judged against months of hindsight. A verdict chip classifies the exit, counterfactual tiles price "if you'd held" on the book you actually closed over that stated window, and every losing trade with a declared stop gets a "vs respecting stop" figure — the gap between your actual exit and what honoring the stop would have given, in either direction.
The analysis runs only on real candles. When no real price data exists for the market, it is withheld rather than computed on fabricated bars, and every claim it does make is traceable to a stated set of bars.
Control
What it does
Price kept going
You won and price continued in your direction after you left.
Well-timed exit
You won and price reversed after you left.
Stopped into a reversal
You lost and price came back your way after the exit.
Stop discipline held
You lost and price kept going against you — the exit saved money.
No clear pattern
Post-exit price action supports no verdict.
Plan vs reality
When a Pantheon trade was fired with a strategy armed, this comparison lists that strategy's rules and asks you, after the close, which ones actually held. Your hindsight record is the value: over several trades, the rule you keep marking false is either the one you keep breaking or the one that is written badly.
One honest caveat: nothing collects rule ticks at entry today, so the Entry column shows an ✗ on every rule — read it as no data, not as answers you gave — and the entry-versus-hindsight "flip" signal cannot fire yet. The summary line saying your hindsight matched your entry read means there was no entry claim to compare against — not a clean bill of health.
This is the self-reported lens; the risk verdict is the ungameable one. They are kept as separate scales on purpose. A trade fired with no strategy armed gets no rule comparison (there is no plan to compare against), and deleting a playbook takes its trades' rule comparisons with it — archive instead if you still want them.
Strategy tagging
Every trade can be tagged to one of your playbooks, to the Experimental bucket, or left Untagged. Untagged means you have not decided yet; Experimental means you decided it was off-playbook. The difference is a record of your own call, not a different analytic treatment — analytics folds untagged trades into the Experimental bucket either way.
Tag one at a time on the trade page, where the chart and your fills are on screen while you decide, or in bulk from the list: Tag mode adds checkboxes and a per-row picker, selection survives filter and search changes so you can gather rows across several passes, and one Apply writes the tag to every selected trade. Filter to Untagged to work a backlog without re-reading trades you already classified.
The first tag into a real playbook earns 5 XP — but only on trades placed through Pantheon. Re-tagging between playbooks, tagging Experimental, clearing a tag, and tagging imported history all earn nothing.
Entry grade, execution grade, mistake tags
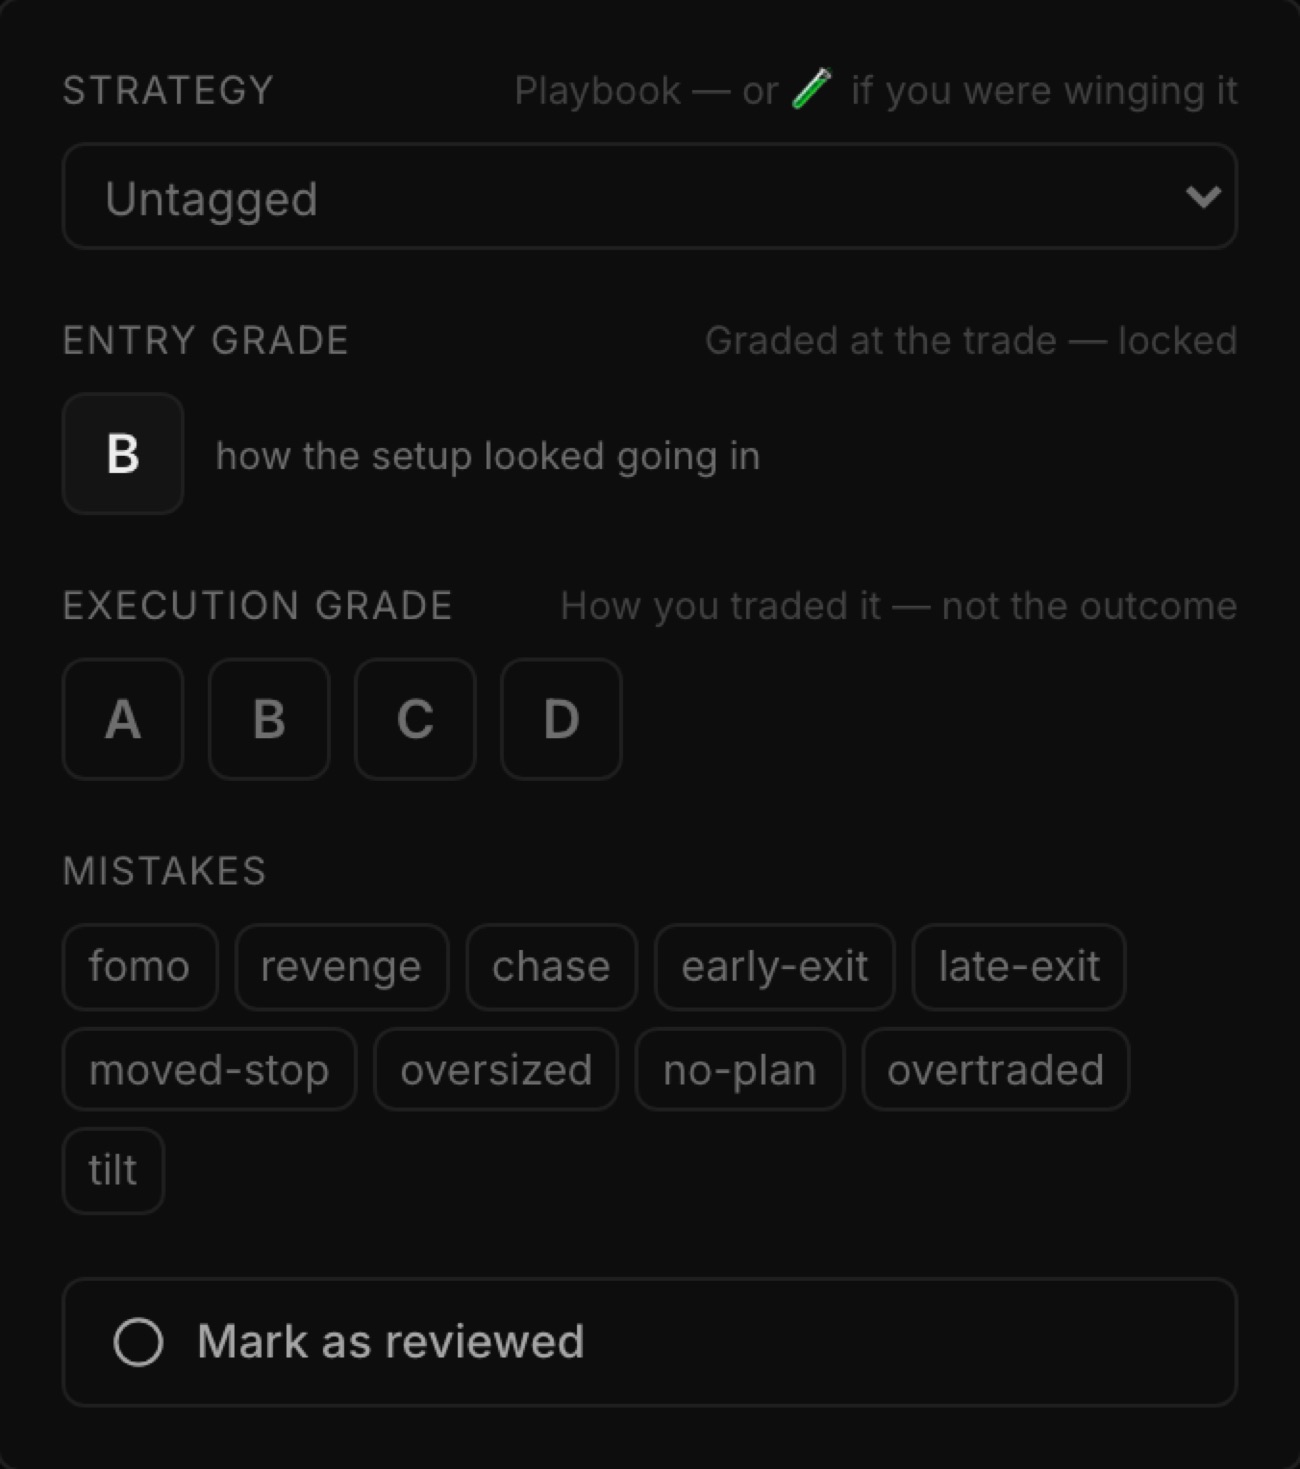
Two grades on the same letter vocabulary, deliberately measuring different things. The entry grade (A/B/C) is how the setup looked going in — you committed it on the ticket at the moment you fired, and it is locked here. A review page that let you regrade your own conviction after seeing the outcome would be worthless. The execution grade (A–D) is how well you actually traded it — a hindsight judgment, so you set it here; click the active grade again to clear it.
Neither grade is about the outcome. A losing trade can be an A execution and a winning trade a D.
Mistake tags are a fixed vocabulary of ten — fomo, revenge, chase, early-exit, late-exit, moved-stop, oversized, no-plan, overtraded, tilt — and you toggle any that apply. They are a per-trade record for you to read back; nothing else aggregates them yet, and they feed no score, no XP and no coach.
The review panel: the entry grade locked at trade time, the execution grade assigned afterwards, and the mistake tags.
Notes and the reviewed flag
Notes are free-form, and saving a note also marks the trade reviewed — one action closes the loop. Mark as reviewed stamps the time and is where the 15 XP review credit attaches (once per trade, Pantheon-placed trades only; un-marking and re-marking does not re-earn).
The only other reader of the reviewed flag is the /start onboarding checklist, whose review-a-trade step completes off it. There are no "needs review" badges, counts or queues anywhere — mark trades reviewed for your own bookkeeping, not to feed one.
Share cards
Sharing is a deliberate act. Pantheon never publishes anything about a trade; the builder renders a PNG that you export and post yourself, and the QR code on the card links the plain pantheonfi.com domain — there is no public deep link to your trade.
You choose what the card reveals: keep the dollar result on, or turn it off and share only the ROI, the R chip and the execution map. Prices on the card are your exact fills either way, and an open position's card carries a LIVE marker so a floating position cannot be mistaken for a booked result.
The chart on the card is tunable — candle size, and how much run-up before entry and aftermath after exit the viewer sees. Formats cover an IG post, an IG story, and a wide web card; export as a download or straight to the clipboard. The PNG is also the Journal's only export: notes, tags, grades and verdicts have no data export today.
How to
Review a trade end to end
Open /journal, filter to Wins or Losses or search the market, and click the row.
Compare Planned R against Realized R, then read the chart: the locked lines are your average entry and exit, the markers are your fills — hover one to see exactly what executed.
Read the risk-discipline verdict first (it is derived from your own orders and cannot be argued with), then the exit analysis for what price did after you left.
If the plan comparison is present, mark honestly which of the strategy's rules actually held.
Set the strategy tag, the execution grade (for how you traded it, not whether it won), and any mistake tags.
Write a note and save — that also marks the trade reviewed.
Tag a backlog of untagged trades
Open /journal and switch on Tag mode.
Filter to Untagged so you only see work that remains.
Select rows — the header checkbox selects every row matching the current filter, not just the 200 the list renders, and selection survives filter changes, so you can gather rows across several searches.
Pick a playbook in the bulk bar, confirm the "Apply to N" count, and apply; the tag writes to every selected trade and the selection clears.
Repeat per playbook; use the per-row picker for one-offs, or apply Untagged to clear tags.
Expect no XP from imported history — the tags are recorded and regroup your analytics, but only Pantheon-placed trades credit the +5.
Find where you lose money to the same mistake
Filter to Losses and sort by R ascending — the worst risk-adjusted losses come to the top (trades with no declared risk count as 0R and fall to the bottom, after every real loss).
Open the top rows and read each risk verdict. Repeated "Widened stop" or "Added past cap" is the mechanical leak.
Do not read "Loss exceeded plan" severity as a magnitude signal — it is pinned to minor by design.
Toggle the matching mistake tags (moved-stop, oversized, revenge) so the pattern is recorded on each trade.
Where the plan comparison exists, record which rules held: the rule you keep marking false is either the one you keep breaking or the one that is written badly.
/strategies
Strategies
Turn your setups into named playbooks, tag trades to them, and read each one's verdict — marry it, date it, or kill it.
Strategies is your playbook library. A playbook is a named setup — a direction and a checklist of conditions that define when a trade counts as that setup. Tag your trades to playbooks and this page reports each one's real closed-trade numbers and a verdict: Marry, Date, or Kill. You can build and edit playbooks without a wallet connected; the statistics need a wallet with trade history, which is pulled in your browser and joined to playbooks by tag.
Playbooks
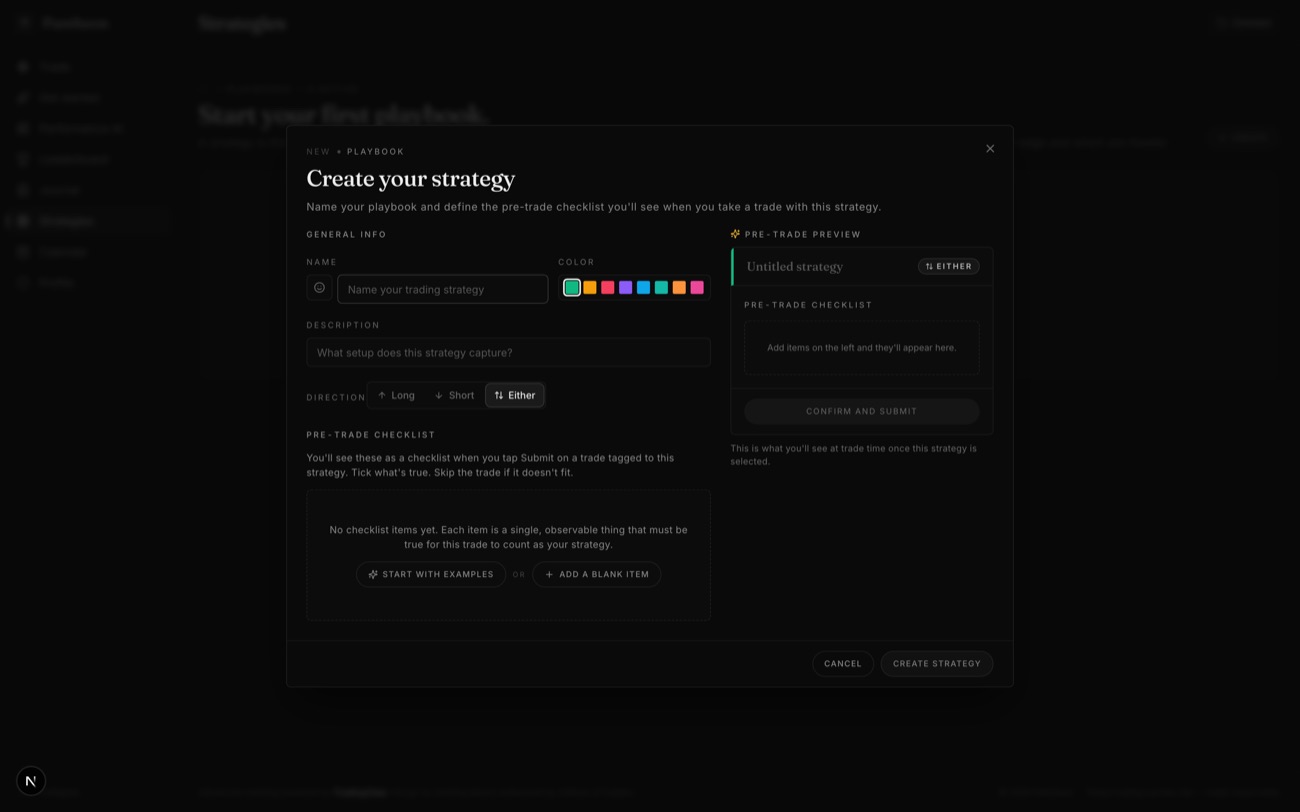
A playbook is a named setup: a title, a long/short/either direction, and a pre-trade checklist of conditions that must be true for a trade to count as that setup. Each playbook gets its own detail page with its verdict, its risk-adherence numbers, its trade list, and a timestamped notes log for recording how the setup is evolving.
Checklist rules are a self-reflection taxonomy, not gates. Nothing blocks, resizes, or rejects an order because a rule is unticked, and nothing interrupts you between clicking Place Order and the signed submit. You write the conditions the setup requires and grade your own execution after the fact, in trade review.
One rule kind is not a checkbox: a max-risk rule caps how much of your equity a single trade on the playbook may put at risk. The current editor only writes self-reported checklist items, so it cannot create one — playbooks that already carry the rule keep it, and the risk-adherence audit measures against it (see "R and the risk-adherence audit"). The rule never sizes or blocks an order: risk percentage on the ticket is a site-wide setting, not per-playbook.
One place a rule count does matter: Zen mode requires at least one active playbook carrying at least one rule before it can be enabled.
Definitions and trades are separate things. Duplicating a playbook copies the definition and its notes log, never its trades. There is no cap on how many playbooks or rules you can have, and no merge operation — to fold one playbook into another, bulk-retag its trades in the Journal and archive the emptied one. Per-rule statistics (follow rate, per-rule P&L) are not measured yet — those columns show dashes rather than zeros that would read as results.
Creating a playbook: name, direction, and the pre-trade checklist — the preview shows exactly what the ticket will show at submit time.
What the numbers count
Every statistic — win rate, average winner and loser, profit factor, expectancy, net P&L, the verdict itself — is computed from closed trades tagged to the playbook. Open positions are counted separately and excluded from every outcome number.
Aggregate numbers are net of trading fees and include funding paid or received. In the per-trade list, P&L is shown price-only with fees as their own single line and funding not shown at all — so a trade's listed P&L and its contribution to the aggregate differ by its fees, plus any funding the position paid or collected while it was open.
Win rate is closed trades with positive net P&L over all closed trades — a break-even close counts against you, not as a win. A value that does not exist yet renders as a dash, not a zero: a playbook with no losers shows a dash for average loser, not $0. The one exception is Net P&L, which shows a muted $0 when a playbook has no closed trades while every other statistic dashes.
Statistics are per wallet. Switching wallets recomputes every number against that wallet's trades, while the playbook definitions themselves are shared across all your wallets.
Verdicts: Marry, Date, Kill
From 3 closed trades a playbook gets one of three verdicts, shown as a chip on its row and as a coaching card on its Overview tab. With 1–2 closed trades the chip reads Undertested — the sample is variance, not edge, and no verdict is claimed. With no closed trades at all, no chip renders.
The classifier measures expectancy in units of your average loss on that playbook: win rate × average win plus loss rate × average loss, divided by the size of the average loss. Marry needs that ratio at +0.20 or better plus positive net P&L. Kill fires at −0.10 or worse, or when net P&L is negative across 8 or more closed trades. Everything between is Date. This ratio is not an R-multiple — R exists only where you declared a stop at entry.
The coaching hardens at 15 closed trades. Under 15, a Marry reads as an early edge and tells you to keep trading it at your normal size, and a Kill tells you to trade it smaller or paper it. From 15 the language becomes a direct instruction — take every setup, or stop taking the setup for 30 days. Size-up advice is never given at any sample size.
The Performance page uses the same thresholds but different inputs: it scores the date range you selected there and groups trades by playbook name, while this page scores each playbook's whole closed history. The two verdicts can legitimately disagree on the same playbook, and neither is broken when they do.
Control
What it does
Values
♥ Marry
Run it — every setup. The playbook is paying you and the sample supports it.
Expectancy ratio ≥ +0.20 and net P&L above zero
◐ Date
Conditional. Refine the entry filter or kill it.
Everything between the Marry and Kill thresholds
✕ Kill
Stop taking it. The playbook loses money at its current rules.
Expectancy ratio ≤ −0.10, or negative net P&L on 8+ closed trades
Undertested
Too small a sample to say anything either way.
1–2 closed trades — no verdict claimed; at zero closed trades no chip renders at all
Tagging trades to a playbook
Two separate acts feed this page, and one trade can walk you through both. You pick a playbook with the Strategy button on the trade ticket and submit: at acknowledgement the order is stamped with a context — the playbook, the stop you declared, your equity at open, your planned size. That stamp is what the risk-adherence audit judges. The playbook's win rate has not moved yet, because statistics group on something else.
Statistics group on the playbook tag on the trade in your Journal — set per row, in bulk, or on the trade's detail page. Until the trade carries that tag it counts in no statistic; you can see it waiting in the "Armed · no fills joined yet" list on the playbook's Trades tab. A manual Journal tag always wins over what was stamped at entry — that is what makes retroactive tagging of imported history work. So if you picked a playbook on the ticket and the win rate looks unchanged, the fix is one step: tag the closed trade in the Journal.
Anything untagged lands in the Experimental bucket, the reserved home for trades taken outside your system. It is not a playbook and never gets a row here. In Zen mode the Experimental option is hidden and an untagged entry will not submit.
Tagging pays 5 XP, at most once per trade and only for trades placed through Pantheon. A ticket pick pays when the order executes — a pick on an order that never fills pays nothing — and a Journal tag pays only for trades not already tagged at entry; imported history earns nothing. Once earned, the 5 is banked to your account and never comes back out: clearing the tag or moving the trade to Experimental subtracts nothing, and re-tagging the same trade never mints a second 5. The full earning rules live on the Profile page.
R and the risk-adherence audit
R is your result in multiples of the risk you committed at entry: if the stop you declared put $100 at risk and the trade made $250, it closed at +2.5R. R only exists where a stop was declared — a trade without one shows a dash, never a substituted figure, and the verdict coaching reports R as n/a when too little of the sample declared risk.
The Risk discipline card on a playbook's Overview answers one question: did you honor the risk you declared? It reads your orders and fills, not checkboxes, so it cannot be gamed by ticking things. The stop declared at entry is the contract, and every stop modification and size add on the trade is replayed against it.
Risk-reducing actions are never penalized — tightening a stop, trailing to break-even, taking partials, and closing early are all fine. Risk-increasing actions are violations, graded by how far past plan they went: a 5% band around plan still counts as honored, to absorb slippage; past that, up to 1.5× plan is minor, up to 2× is major, and beyond 2× is severe.
What counts as measurable depends on the playbook. On a playbook with no max-risk rule, only trades with a declared stop are measurable — a no-stop trade is excluded from the adherence rate entirely, not counted as a violation, not counted as honored. On a playbook carrying a max-risk rule, a no-stop trade is measurable against that cap, and a loss past the cap is a violation — the "No-stop over cap" chip — graded by the same severity bands. Adherence is the share of measurable trades with zero violations; the breakdown chips count violations, not trades, so one trade that added size past plan and then realized a loss past plan raises two.
Archiving and deleting
Archive is a soft retire. The playbook leaves the main table and both tagging pickers, so no new trades can be tagged to it, but its detail page still resolves and still computes statistics, and its checklist and notes survive. Restore brings everything back, including name resolution on already-tagged trades.
Delete is permanent. The definition and its detail page are gone; trades tagged to it keep their tag but can never resolve a playbook name again.
Where your library lives
Playbook definitions live in your browser and are mirrored to your account, so the library follows you across devices. The local copy is the source of truth — a failed sync never blocks or changes it — and when the two sides reconcile at sign-in, an empty side never wins, so a fresh browser cannot wipe a real library.
Definitions are shared across every wallet you connect; trade data stays scoped to the wallet that traded it. That is why one playbook can show different statistics on two wallets — one definition, separate books.
Trade data is handled differently from definitions. Your fills are pulled from Hyperliquid in your browser, kept in a brief in-session cache and a saved last-known snapshot so a reload paints your last data instantly instead of spinning, and merged with Pantheon's durable record of Pantheon-placed trades — which is how trades old enough to have aged out of the venue's fill history still count. The merged set is reconstructed into trades and joined to playbooks by tag.
How to
Create your first playbook
Click Create on /strategies and name the setup — the name is the only required field.
Set the direction to Long or Short if the setup is one-sided; leave it on Either otherwise.
Build the checklist, one observable condition per line. "Start with examples" seeds five generic items to edit or delete.
Once the list gets long, organize items into named sections such as Trend, Location, Confirmation, Risk.
Save. You land on the playbook's detail page, ready to take trades against it.
Get trades reporting into a playbook
Pick the playbook with the Strategy button on the trade ticket before you submit, and set a stop if you want the risk-adherence numbers to be measurable.
Submit. On acknowledgement your declared stop, equity at open, planned size, and the playbook are recorded against the order.
After the trade closes, tag it in the Journal — set the trade's Strategy dropdown to the playbook. This tag is what the statistics group on; until it is set, the trade waits in the playbook's "Armed · no fills joined yet" list.
To tag many trades at once, select rows in the Journal and apply a playbook from the bulk bar.
Back on /strategies, the playbook's trades, win rate, averages, and net P&L now include that trade.
Read a verdict and act on it
Open the playbook and check the sample size first — with 1–2 closed trades the chip reads Undertested (with none, no chip renders at all) and there is nothing to act on yet.
Read the verdict card on Overview: the chip, the headline built from your actual numbers, and the action line.
Check the cumulative P&L line for shape — a Marry on a curve that has been flat since an early spike deserves a second look.
Act on the chip: Marry, keep taking the setup at your normal size; Date, tighten the entry filter — usually by cutting the session the copy names; Kill, stop taking it and revisit only with stricter rules.
If the Performance page shows a different verdict, neither is broken — it scores your selected date range, this page scores the playbook's whole closed history.
Audit whether you honored your risk
Open the playbook's Overview and read Adherence — the share of measurable trades with zero violations.
Read the violation chips for the shape of the failure: Widened stop, Added past cap, No-stop over cap, Over plan. They count violations, not trades, so one trade can appear in two.
Compare average planned risk with average realized loss on losers — realized above planned means your losses cost more than you budgeted.
For any single trade, open it from the Trades tab and use the Journal's per-trade review.
If Adherence reads a dash, nothing was measurable: no trade declared a stop and the playbook carries no max-risk rule. Start declaring stops on the ticket — an unmeasurable trade is excluded, not passed, so a dash is silence rather than a clean record.
/calendar
Economic Calendar
The week's high-impact USD, EUR, GBP and JPY releases, each with a plain-English explanation, scenario logic, and a pre-release risk note.
/calendar is the week's schedule of the economic releases that reprice risk assets: the high-impact USD, EUR, GBP and JPY events, in your local time, each with what it measures, what the market expects, and what the number means once it lands. Reach it from Calendar in the sidebar. It needs a signed-in session — the feed is only served to signed-in traders — but no wallet and no trade history. It is the same feed that drives the news pill and the pre-release warning on /trade, so what you read here is what /trade will tell you later.
What the calendar covers
The calendar shows only the releases likely to move crypto: high-impact events for USD, EUR, GBP and JPY. Medium- and low-impact releases and all other currencies are filtered out before they reach your browser — a typical week is 6 to 10 events. The filter is fixed; there is no control to widen it.
Each event carries its release time in your local zone, the market forecast, the prior period's figure, the actual once published, and a plain-English line on what the release measures. Upcoming events add a one-line read from Athena, Pantheon's AI trading coach; released events drop the read, and it is best-effort — an upcoming event without one is normal, not broken. A handful of US series also carry implied odds from Kalshi, a prediction market.
Everything on the page renders in your browser's local time zone, and the header names which zone that is. An event the source has not yet given a firm time shows TBD instead of a clock — no countdown, because counting down to a placeholder would be a fabricated deadline.
A week of high-impact releases grouped by day, each with its forecast; the backdrop line reads the tape into the week's releases.
This week and next week
The grid runs Monday to Sunday in your local days. A toggle switches between the current week and the following one; the date range beside it names the week you are looking at.
If the feed no longer lists any events for the current week and next week has some, the page advances you once — and says so: "Nothing left this week — showing next." The trigger is the feed emptying, not the last print landing: the upstream calendar keeps released events in the current week until it rolls over to the next one, typically on Sunday, so a Saturday with every number already published still shows this week. Once you touch the toggle yourself, your choice is pinned for as long as you stay on the page and it never moves you again during that visit; a reload starts fresh.
Next week's schedule is best-effort. The upstream calendar usually publishes it over the weekend; until it does, the Next week view says the schedule isn't published yet rather than claiming a quiet week.
Market backdrop
The This week view carries one strip: the 5-day percentage moves in the S&P 500, the Nasdaq and Bitcoin, plus a single sentence on what that setup means for volatility into the week's releases. It is a page-level read about positioning, stated once — never a direction call, and never repeated per event.
The sentence has three forms. Both equity indices down: traders are already defensive, so a reassuring number has more room to spark a bounce than a bad one has to add pressure. Both up: good news is already in the price, so a miss tends to sting more than a beat helps. Mixed or flat: positioning is roughly neutral going in.
When the 5-day Bitcoin series is unavailable, the strip substitutes Bitcoin's 24-hour move under the same label.
Reading an event
Click any event to open its detail. The top line explains what the release actually measures — what Non-Farm Payrolls counts, what CPI tracks, that a PMI above 50 means expansion. The same description follows the event onto /trade's news surfaces.
Below it sit three tiles: Forecast (the market consensus), Prior (last period's figure) and Actual (the published number). Actual reads "pending" for the first 24 hours after the scheduled time, then "—" — past that point no source is going to deliver it. Speeches and press conferences skip the tiles entirely: there is no number to beat, and the panel says the tone and the detail are what move markets.
Once a figure lands, the verdict states higher, lower or as expected, the gap against forecast — for example "0.3% against a 0.2% forecast" — and, where the page can explain the mechanism in plain English, one sentence on what that does to the rate outlook for that economy's central bank. A release outside that explained set gets the headline and the gap only. Colour follows the economic meaning: green when the result is the favourable one, red when unfavourable, amber when it lands exactly on forecast.
Pre-release text follows a strict honesty ladder. A directional claim appears only when the page's own backtest distinguishes that pattern from a coin flip; a size claim only when the measured move clears the bar described under Measured reactions below. Failing both, the line just says what the release is — a missing claim is deliberate silence, not a gap.
Scenarios and betting-market odds
Upcoming events with a parseable forecast and a release type the page knows how to explain get three "What to watch for" rows — higher than forecast, right at it, lower than forecast — each with the plain-English consequence for the rate outlook. A forecast alone is not enough; without the explanation there are no rows.
When Kalshi prices the series, the higher and lower rows carry the crowd's implied odds — "a 60% chance it lands above the forecast" — quoted from live market prices and refreshed with the feed, so they run at most a few minutes behind the market. The lower row's number covers at or below the forecast, because it is the complement of a strictly-above probability. Odds appear on US releases only — CPI, Core CPI, Nonfarm Payrolls, the Unemployment Rate, GDP and Jobless Claims — so their absence on a GBP or EUR event says nothing about that event.
A surprise note beneath the rows names which result the crowd expects, and therefore which result would be the genuine surprise — usually the one that moves markets most. When the odds sit within a few points of even, the note says the crowd has no clear lean and warns the move can still be sharp.
The Fed's rate decision quotes no odds by design: those markets price hike or cut actions, not above-or-below a forecast, so converting them would produce a number that means nothing.
Measured reactions and the pre-release warning
Every event carries the amber "before you trade this" block. Its logic: releases whip — price moves hard in both directions before it picks a side, and traders who commit early get stopped out on the reversal. Unless you are already holding a swing through the event inside your plan's ranges, the edge is not trading it at all.
The calendar quotes a measured Bitcoin reaction only when it has backtested that specific release and the measured swing beats an ordinary Bitcoin day (about 2.2%) by at least 15% — a bar of roughly 2.6%. A release measured at 2.4% moves more than an ordinary day and is still withheld. On the current backtest only the FOMC family clears the bar, and a quoted figure always comes with its sample size.
Live releases and feed status
From shortly before a scheduled release until the figure arrives, the page runs hot: a LIVE badge shows while the feed is refreshing every few seconds, and it drops the moment the number lands — or half an hour after the scheduled time at the latest. LIVE never renders over a lost, expired or delayed feed; the badge is a claim of freshness and the page will not make it falsely.
When a number first arrives, a toast announces it with the verdict and what it means, styled by the economic meaning of the result. Each event toasts once, only for a genuinely fresh print within half an hour of schedule; numbers that landed before you opened the page are never replayed. The toast exists only on this page — there is no push, email or cross-page notification. Away from /calendar, the /trade news pill and its thirty-minute dialog are the only reminders you get.
The header dot is the honest statement of what you are looking at, separating states that would otherwise all read as "no events". A healthy feed on a genuinely quiet week shows a grey dot — the explicit empty-state message below the grid, not the dot, is what tells you the week is quiet. If your session expires with events on screen, the events stay, marked as your last fetch — sign back in to refresh them.
Control
What it does
Values
Live
Feed is current and the viewed week has events.
green
Loading
First fetch in flight. The grid shows empty columns — never a claim that the week is quiet.
amber, pulsing
Delayed
The server returned its last-known-good copy; the header shows the data's age in minutes.
amber
Connection lost
A refresh failed. The grid keeps the last fetched events and the state clears on the next successful fetch.
red
Signed out or expired
The feed is only served to signed-in sessions. Events already on screen stay, marked as last fetched, until you sign back in.
grey
How the calendar reaches /trade
/trade reads the same feed and the same copy. The news pill on the Discipline Rail names the next timed high-impact event up to 14 days out — a live countdown inside 24 hours, a day and clock time beyond that — and when there is nothing to count down to, it says so explicitly (all clear, times not yet set, or feed down) rather than going blank. You can switch the pill off in /trade's header settings; the pre-release warning below keeps firing regardless.
Thirty minutes before any timed high-impact event, /trade raises a warning dialog naming the event, with the same pre-release text as the amber block here. It blocks nothing — self-custody means your wallet is your authority — it only asks for a deliberate acknowledgement, and it remembers per event, so a refresh will not re-prompt you for the same release.
Any fresh entry you open within 30 minutes either side of a high-impact release is stamped with that proximity in its journal entry — the event, its currency, and the signed minutes to or from it. Adds to an existing position and closing orders are not separately journaled, so they carry no stamp. That recorded fact is what lets /performance compare your news-window entries against the rest of your book.
How to
Plan the week before Monday
Open Calendar from the sidebar and check the header dot is green.
Read the market backdrop for how equities and Bitcoin have moved into the week.
Scan the grid: amber dots mark each release, "fc" values show the consensus.
Open the events on days you plan to trade and read the description and the What to watch for rows.
Note which events have published times — each will interrupt you on /trade thirty minutes out; TBD events will not.
Switch to Next week to see how far the published schedule extends.
Read a number that just landed
With /calendar open, the header shows LIVE while a number is due; when the print lands, the toast announces it with its verdict and the LIVE badge drops. The toast fires on this page only — no other page shows it.
Find the event in today's list; its row now carries the figure and its colour.
Click the row to open the detail panel.
Read the Forecast / Prior / Actual tiles for the numbers.
Read the verdict for the gap against forecast and — where the page has a read on the mechanism — what it does to the rate outlook for that economy's central bank.
Decide whether to trade into a release
Open the event and read the What to watch for rows: what a higher, on-forecast and lower number would each mean.
If betting-market odds are shown, read the surprise note — the genuine surprise is usually what moves markets most. Odds only appear on US releases; their absence says nothing about the event.
Read the amber pre-release warning block, including any measured Bitcoin reaction and its sample size.
If you trade it anyway, expect the thirty-minute dialog on /trade — unless the release time is still TBD.
If you open a fresh entry, expect it to be stamped with its proximity to the release in your journal — adds to an existing position and closes are not separately journaled, so they carry no stamp.
/profile
Profile
Your standing — level, XP, Performance and Discipline — plus the streak mechanics, your wallets, your fee rate, trading modes, and the account reset.
Profile is the account page: where you stand, how the XP economy pays, which wallets are on your account, the rate you pay per fill, and the controls that reset an account. One split explains most of what you see here — rank, level, XP and the Elysium track belong to your account and follow you across wallets and devices, while Performance, Discipline and the streaks are computed from the trades of whichever wallet you are currently tracking.
Levels and tiers
Your level is always derived from your total XP — nothing stores a level. Levels run 1 to 100, and advancing from level L to L+1 costs L² + 40 XP. The curve is deliberate: early levels arrive within a day or two of normal activity, later ones take weeks, and reaching Deity is a multi-year project. Routine earners pay +5 to +20 before multipliers, so at base amounts no single action clears a level; a heavily multiplied account can clear the earliest levels in one earn, and one-time volume milestones can clear several at once.
Five tiers band the levels (see the ladder below). The rank card shows your tier, level, and progress through the current level. "Rank" here means that tier-and-level standing plus your total XP — it is not a leaderboard position.
XP is account-scoped: one total across every wallet and every device. If the account ledger cannot be reached, the page falls back to the sum this browser derived, labelled "this device only" — treat that as a floor, not your real total.
The activity panel lists your recent XP events with their amounts. On a browser that has not earned anything itself, it shows your account's per-kind totals instead, so a fresh device still reflects everything you have banked.
Control
What it does
Initiate (I)
Levels 1–15
Acolyte (II)
Levels 16–35
Adept (III)
Levels 36–60
Oracle (IV)
Levels 61–90
Deity (V)
Levels 91–100
Performance and Discipline scores
Performance and Discipline are separate 0–100 scores and are never averaged into one number on this page. A trader who loses money but holds the line reads low on P and high on D; a trader who wins on oversized, unstopped trades reads the opposite. Collapsing them would hide exactly the thing worth seeing.
Performance is the mean of six outcome axes read from your fills: win rate, profit factor, average win-to-loss, consistency (how much of your P&L one day carries), max drawdown, and recovery factor. With no closed trades in the sample, nothing is measured and the score reads "—" rather than a fabricated number.
Discipline is the equal blend of two observed behaviors — neither is self-reported. Sizing adherence is the share of trades whose risk stayed at or under 2% of your account for the entire time they were open, adds included; on a $10,000 account that is $200 of risk per trade. A declared double-zone scale-in is allowed twice that. A trade entered with no stop has unbounded risk and automatically fails.
Stops honored is the share of trades that carried a stop committed at entry and closed holding a stop at or tighter than that one. Moving the stop mid-trade is fine — only the stop in force at the close is judged, with a small tolerance so a few ticks of overshoot is not counted as a fold. Closing with no stop in force at all fails. Discipline reads "—" when neither axis is measurable, as with imported fills that carry no declared plan.
How XP is earned
Every outcome reward is measured in R, never in dollars of profit. 1R is the amount you committed to lose at the stop you set before entry: risk $100 and close up $200, and the trade closed at 2R. No stop committed at entry means no R — the trade still counts toward your discipline reads, but it mints nothing.
Three rules govern the economy. Outcome rewards are risk-normalized, as above. Every R-based earner is capped at three per day, and the day resets at midnight UTC. And an undeclared trade earns nothing anywhere. Beyond that, one gate set covers every outcome earner: the 2R/3R rewards, the disciplined-loss reward and the target-hit reward all require the stop never widened past its original placement and the trade sized within the per-trade risk cap. The sizing verdict is the same one Elysium uses for its oversize eject — judged against your account equity at that trade's entry, deposits and withdrawals included — so one trade can never mint outcome XP and break your run at the same time: an oversized trade earns nothing, win or lose. Where a trade's entry equity was never measured, the win-side rewards get the benefit of the doubt and the disciplined-loss reward is withheld — it pays for the sizing discipline itself, so it never pays when the cap could not be checked. XP never pays for raw volume or raw P&L — no reward for trade count, dollars won, or per-trade volume.
Only trades placed through Pantheon's own ticket earn. Imported history — and journaling or tagging it later — pays nothing, which is why loading old fills never inflates a level. Outcome earners also require planned risk of at least $10; below that floor a trade cannot farm XP.
The earners: daily check-in +10 (claimed on the Performance page); reviewing a trade in the journal +15 and tagging it to a real strategy +5, each once per trade with no daily ceiling (Experimental and untagged pay nothing). Per trade, under the three-per-day cap: stop moved to break-even or better at 1R and held to the close +10; a close at 2R or better +10; at 3R or better +15 (2R and 3R share one cap); a declared, in-rule loss closed on its planned stop +10; an exit at or beyond your declared target +5. Win streaks pay +10/+15/+20 from the third straight win, uncapped.
Multipliers apply when an earn is banked. Elysium doubles everything while active, and lifetime Pantheon volume sets a permanent multiplier (ladder below); the combined multiplier is capped at 4×, so the most a routine earner can bank is 80 XP. Crossing a volume band for the first time also drops a one-time flat bonus, from +100 at $1M up to +6,000 at $500M — milestones are never multiplied. The server prices and dedupes every event, and the trade-outcome earners it derives itself from your fills — a browser cannot claim an outcome it never traded, and the same trade can never mint twice. Banking is one-way: once an earn is in the ledger, undoing the action — clearing a strategy tag, moving the trade to Experimental — never subtracts it. It only stops further minting, and re-tagging later cannot pay the same +5 twice.
Control
What it does
Minnow
1.0× — from $0 lifetime volume
Dolphin
1.1× — at $1M
Shark
1.25× — at $10M
Orca
1.5× — at $50M
Whale
1.75× — at $100M
Leviathan
2.0× — at $250M
Elysium — the clean-trade multiplier
Elysium is the one multiplying streak: twenty consecutive clean trades put you in it, and every XP earn doubles until a discipline break ejects you. The count is trades, not days, and it is account-wide, kept on the server.
A clean trade is placed through the Pantheon ticket, sized within the fixed 2% per-trade cap (4% on a declared double-zone entry, adds included), never has its stop widened past its original placement, carries a real strategy by the close — declared on the ticket or tagged afterward in the journal — and is not a revenge entry, meaning opened within fifteen minutes of your last trade closing at a loss (the Trade page documents the full tilt machinery). An explicit Experimental entry breaks the run; a trade still untagged at close is currently given the benefit of the doubt by the account-side count — do not lean on that. A losing trade that dies by the rules is clean. Losses never eject you; only a rule break does.
A break resets the track to zero and leaves a one-line receipt naming the day and the cause — stop widened, oversize, no strategy, or revenge entry. Elysium's 2× stacks with the lifetime volume multiplier, capped at 4× combined.
The Elysium track on a fresh account: 20 clean-trade segments to the 2× XP multiplier.
Win streaks
The win streak counts consecutive qualifying wins and dies on the first loss. It is trade-sequenced, not day-sequenced. A breakeven trade is neutral — within ±0.1R of your declared risk (±$1 when no stop was declared), it neither extends nor kills the streak.
A win qualifies when the trade was declared on the ticket, closed positive beyond the breakeven band, and carried planned risk of at least $10. The floor exists so dust trades cannot farm a streak.
The first two wins pay nothing. The third straight win pays +10, the fourth +15, the fifth and every win after +20. There is no daily cap — the +20 plateau is the cap. The mechanic pays for running disciplined winners to plan, not for opening more trades.
Wallets and tracking
The wallets card lists every wallet on your account, across all your devices. A wallet joins the list the first time you connect it — Connect in the header, approve the address in your extension; there is no add-address form. The list mirrors to your account, so a wallet connected on one device appears on the others. XP is one account across all of them — connecting a second wallet never splits your progress.
Two roles matter. The signer is the wallet your extension is connected with: it signs orders, and it is what the fee card reads. The tracked wallet is the one whose trades drive the scores, streaks, journal and performance views. They are usually the same wallet; Track on any row re-points the data.
Track a wallet your extension holds and the signer switches with it. Track one it does not hold and you get view-only: the row is badged Watching, the data follows that wallet, and trading is disabled until you switch back.
Forget and Clear data are different things. Forget removes a wallet from your list and is reversible — nothing is deleted, and reconnecting the address restores it exactly as it was. Clear data permanently deletes that wallet's local Pantheon data on this device: journal entries, trade contexts, plan and risk settings, checklist history, and its trading approval. It never touches your fills — trade history settles on Hyperliquid and is re-read when you reconnect. Both actions are locked on the wallet you are currently tracking or signing with; switch first.
Trading fees
You pay one total rate per fill: a taker rate when you remove liquidity (market orders, IOC limits, triggered stops) and a maker rate when a resting limit order of yours is matched. Fees are charged on the notional value of each fill and are never decomposed — the number shown is the number you pay.
Your rate is not flat. It steps down with your rolling 14-day traded volume; volume is assessed daily and your tier updates automatically, with the live rate and tier read from Hyperliquid. With no wallet connected, the card shows the standard entry rates — 0.0750% taker, 0.0450% maker — and says so rather than inventing a tier you have not earned.
The fee card follows the wallet you are connected with, not the one you track: track someone else's address and everything else on the page follows it while these rates stay yours. "View fee schedule" opens the full ladder with your tier highlighted; your headline rate can sit below your tier's row because it is already net of any discounts your address qualifies for.
Trading modes — Degen, Locked In, Zen
The mode selector lives in the trade screen's header, but it governs whether the discipline rules this page scores are enforced, warned about, or silent, so it is documented here. The three modes are the same app, the same account and the same data — they differ only in enforcement.
Mode never changes what is measured. Sizing, stops and clean-trade classification are recorded identically in all three, so your Discipline score and Elysium track are unaffected by which mode you trade in. Switching modes earns no XP.
Degen and Locked In switch instantly. Zen is gated: entering requires at least one real strategy carrying at least one rule, because Zen refuses untagged entries and would otherwise lock you out of trading entirely. Leaving Zen never takes effect on the tap — it arms a flat six-hour rollover held on your account, so it survives reloads and applies on every device; a "stay locked" action cancels it. The consent screen counts that rollover as Zen's sixth rule — the other five are the hard gates listed below.
Control
What it does
Values
Degen
No platform gates at all. Your own declared lockout still stands — that is your rule, not ours.
Instant switch
Locked In
The default. Every rule is shown and every violation interrupts you, but nothing hard-blocks.
Instant switch
Zen
The only mode that refuses orders. Risk over 2% per trade is blocked (4% on a declared double-zone entry); every entry must carry a stop set at open; hitting your daily loss limit — 6% of equity by default, or your declared plan limit if you set one — locks new entries for six hours; open risk across all positions is capped at 12%; every entry must be tagged to a real strategy — no experiments.
Eligibility-gated · 6-hour exit
Starting the account over
"Start this account over", at the bottom of the page, exists to clear XP an account never earned — after a test period, or after inheriting state in a shared browser — without destroying your work. Nothing runs until you confirm a screen that states the full scope.
What it clears: banked XP is floored on the account, so level, rank and XP history restart at zero and pre-reset earns can never re-mint; daily check-in history is cleared; and this browser's Pantheon data is parked under an archive — moved, not deleted, and recoverable.
What it preserves: your strategies, your wallet list, your journal and checklist history, your trade history (it lives on the exchange and is untouched) — and your lifetime volume, which is server truth, so your whale tier and its permanent multiplier keep their value through the reset. Strategies and wallets restore themselves from your account within seconds of the reload.
How to
Point the page at a different wallet
In the Wallets card, click Track on the wallet's row — the header wallet chip is read-only and never does this.
If your extension holds that address, the signer switches with it: data and trading land on one wallet.
If it does not, the row is badged Watching: scores, streaks and activity now reflect that wallet, and trading is disabled until you switch back.
The Trading Fees card keeps showing your connected wallet throughout.
To go back, click Track on your own wallet's row.
Build a run to Elysium
Trade through the Pantheon ticket, set your stop at open, and put a real strategy on every trade — declared on the ticket at entry or tagged in the journal before the close. An explicit Experimental entry breaks the run.
Keep each trade sized within the 2% per-trade risk cap (4% on a declared double-zone entry), including adds.
Never widen a stop past where you set it — tighten it or leave it. Pulling a stop entirely does not eject you, but it forfeits the disciplined-loss reward and dents your stops-honored score.
Do not re-enter within fifteen minutes of a losing close — that is the revenge window.
Watch the track fill. A loss taken by the rules keeps the run alive; only a rule break resets it.
At 20 clean trades the card flips to "In Elysium" and every XP earn doubles until a break ejects you.
Clear a wallet's data on this device
Track a different wallet first — Clear data is locked on the wallet you are tracking or signing with.
Click Clear data on the row and read the dialog: journal entries, trade contexts, plan and risk settings, checklist history and trading approval are deleted; your trade history and strategy library are not.
Confirm. This cannot be undone.
Your fills are untouched — reconnecting the wallet re-reads them from the exchange.
Start the account over
Click "Start over…" at the bottom of the page and read the scope before confirming.
Confirm what clears: XP floored to zero, check-in history cleared, this browser's data parked (recoverable).
Confirm what survives: strategies, wallets, journal and checklist history, your trade history on the exchange, and your whale tier.
Click "Yes, start over". The page reloads; strategies and your wallet list restore from your account within seconds.
If it fails, the card names the reason and your local data was not parked — a partial failure can leave the XP floor already applied. Retry to finish.